Cake Decorating Tutorials  (How To's) Tortas Paso a Paso
Cake Decorating Tutorials (How To's) Tortas Paso a Paso
Вернуться   Cake Decorating Tutorials (How To's) Tortas Paso a Paso > Figure making tutorials > Flowers Trees Tutorials
Перезагрузить страницу Пуансеттия,Poinsettia,Weihnachtsstern, vánoční hvězda, Flor de Pascua
Старый 18.10.2011, 17:46
Ariana Ariana вне форума
Администратор
Регистрация: 07.09.2010
Сообщений: 7,940
По умолчанию
Название: 11.jpg
Просмотров: 4

Размер: 239.1 Кб

Название: 12.jpg
Просмотров: 7

Размер: 349.3 Кб

Название: 13.jpg
Просмотров: 4

Размер: 258.5 Кб

Название: 14.jpg
Просмотров: 3

Размер: 250.9 Кб

Название: 15.jpg
Просмотров: 4

Размер: 268.8 Кб

Название: 16.jpg
Просмотров: 2

Размер: 316.2 Кб

Название: 17.jpg
Просмотров: 6

Размер: 255.2 Кб
Старый 24.10.2011, 06:36
Ariana Ariana вне форума
Администратор
Регистрация: 07.09.2010
Сообщений: 7,940
По умолчанию
Огромная благодарность Автору bozka52 за Мастер-класс
Название: 1318966727.jpg
Просмотров: 6

Размер: 70.0 Кб

Название: 1318966741.jpg
Просмотров: 2

Размер: 44.0 Кб

Название: 1318966757.jpg
Просмотров: 2

Размер: 37.5 Кб

Название: 1318966785.jpg
Просмотров: 2

Размер: 46.9 Кб

Название: 1318966821.jpg
Просмотров: 2

Размер: 54.9 Кб

Название: 1318966845.jpg
Просмотров: 2

Размер: 51.4 Кб

Название: 1318966876.jpg
Просмотров: 6

Размер: 47.9 Кб

Название: 1318966901.jpg
Просмотров: 2

Размер: 73.9 Кб

Название: 1318966914.jpg
Просмотров: 5

Размер: 63.2 Кб

Название: 1318966928.jpg
Просмотров: 2

Размер: 48.5 Кб

Название: 1318966945.jpg
Просмотров: 2

Размер: 53.0 Кб

Название: 1318966955.jpg
Просмотров: 3

Размер: 47.0 Кб

Название: 1318966970.jpg
Просмотров: 2

Размер: 64.7 Кб

Название: 1318966988.jpg
Просмотров: 2

Размер: 54.4 Кб

Название: 1318967008.jpg
Просмотров: 2

Размер: 60.8 Кб

Название: 1318967038.jpg
Просмотров: 2

Размер: 47.1 Кб

Название: 1318967062.jpg
Просмотров: 3

Размер: 62.5 Кб

Название: 1318967095.jpg
Просмотров: 2

Размер: 67.6 Кб

Название: 1318967105.jpg
Просмотров: 4

Размер: 60.3 Кб
Старый 29.11.2011, 21:37
Ariana Ariana вне форума
Администратор
Регистрация: 07.09.2010
Сообщений: 7,940
По умолчанию
Огромная благодарность Автору за Мастер-класс
Название: Anna Modugno Natal em Biscuit n 2 ed Online 023.jpg
Просмотров: 3

Размер: 134.0 Кб

Название: Anna Modugno Natal em Biscuit n 2 ed Online 024.jpg
Просмотров: 2

Размер: 130.9 Кб

Название: Anna Modugno Natal em Biscuit n 2 ed Online 025.jpg
Просмотров: 2

Размер: 110.6 Кб
Старый 08.12.2011, 17:45
Ariana Ariana вне форума
Администратор
Регистрация: 07.09.2010
Сообщений: 7,940
По умолчанию
Название: img200.jpg
Просмотров: 2

Размер: 277.0 Кб

Название: img201.jpg
Просмотров: 3

Размер: 278.1 Кб

Название: img202.jpg
Просмотров: 3

Размер: 356.7 Кб
Старый 10.05.2012, 06:59
Ariana Ariana вне форума
Администратор
Регистрация: 07.09.2010
Сообщений: 7,940
По умолчанию
Огромная благодарность Magie des Zuckers за Мастер-класс
Название: 01.jpg
Просмотров: 2

Размер: 126.6 Кб

Название: 02.jpg
Просмотров: 0

Размер: 105.3 Кб

Название: 11.jpg
Просмотров: 0

Размер: 160.7 Кб
Старый 21.05.2012, 19:11
Ariana Ariana вне форума
Администратор
Регистрация: 07.09.2010
Сообщений: 7,940
По умолчанию
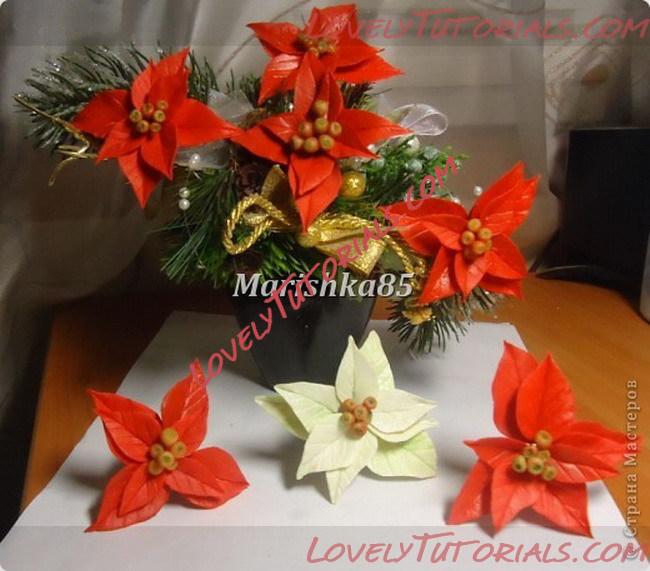
Огромная благодарность Marishka85 за Мастер-класс

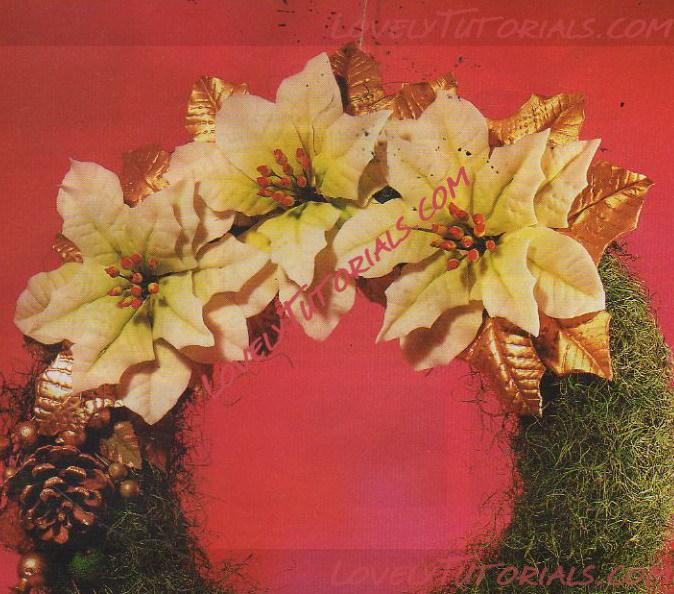
В преддверии новогодних праздников можно увидеть много новогодних украшений, одним из праздничных цветков по праву стала пуансетия. Видя эти замечательные цветы, всегда вспоминаются красивейшие венки с ними. Предлагаю и вам слепить такие красивые рождественские цветы.
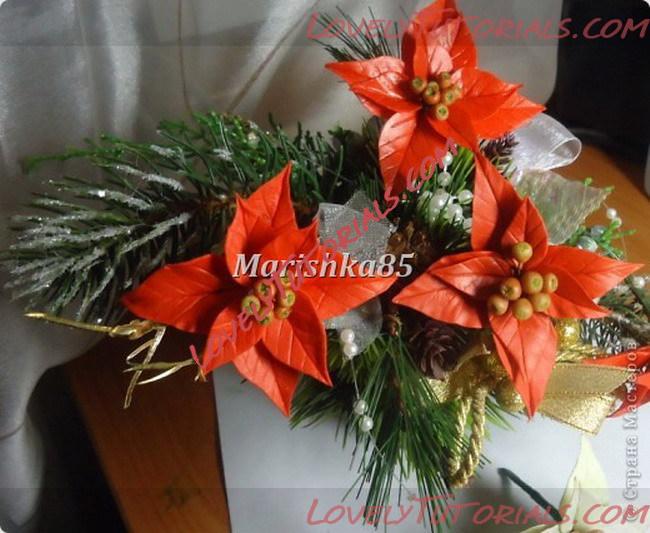
Название: 1.jpg
Просмотров: 1

Размер: 100.3 Кб


Итак-с приступим. Нам понадобится:
1. Масса для лепки, я лепила из floral Modelling, а серединки из модерна
2. Стек, ножницы
3. проволока самая тонкая для кружочков в серединки, и потолще для лепестков.
4.Молд листа( на фото молд клубничного листа)
5.Тейп лента и клей пва
Для тонирования цветка:
1. кисточки разной толщины, 3 шт
2. краски масляные: кадмий красный, травяная зелень, кобальт фиолетовый
3. Разбавитель для масл. красок
4. салфетки
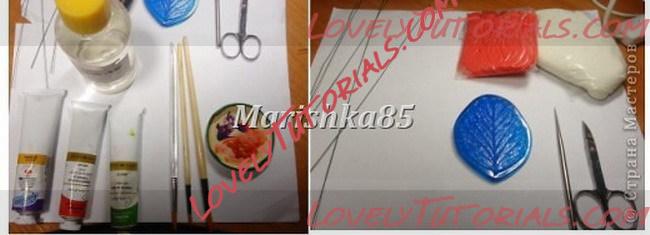
Название: 2.jpg
Просмотров: 1

Размер: 41.0 Кб


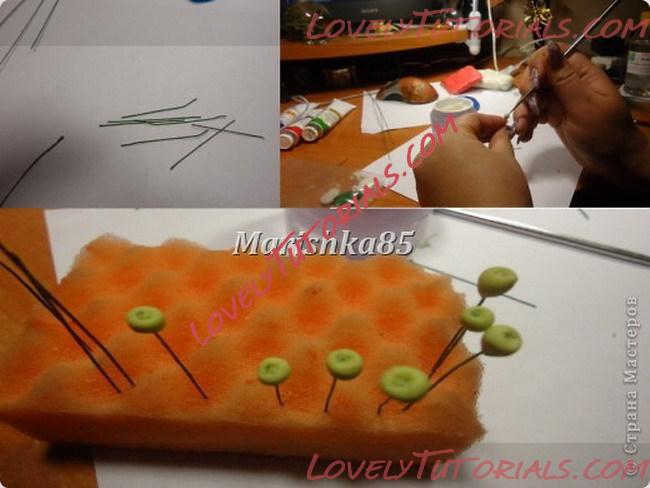
Нарезаем тонкую проволоку кусочками 4-5 см.
На кончике проволки делаем петельки, и прижимаем их плотненько к основания(шарики будут маленькие).
берем белую массу и слегка подкрашиваем зел. краской, оттенок должен получится лимонным.
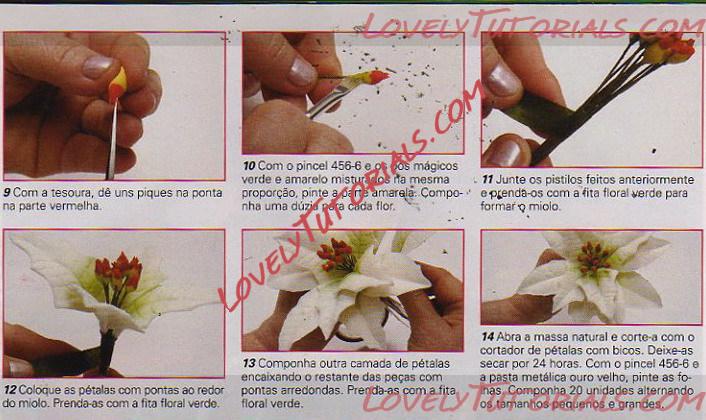
формируем маленькие шарик(около 3-4мм) одеваем его на проволку(предварительно макнув ее в клей пва), снизу прижимаем, формируем что-то вроде приплюснутой капли, сверху шарик тыркаем стеком( либо зубочисткой). Отправляем сушится, нам понадобится от 5 до 9 тычинок.( Сколько вам не лень сделать)
Название: 3.jpg
Просмотров: 0

Размер: 66.5 Кб


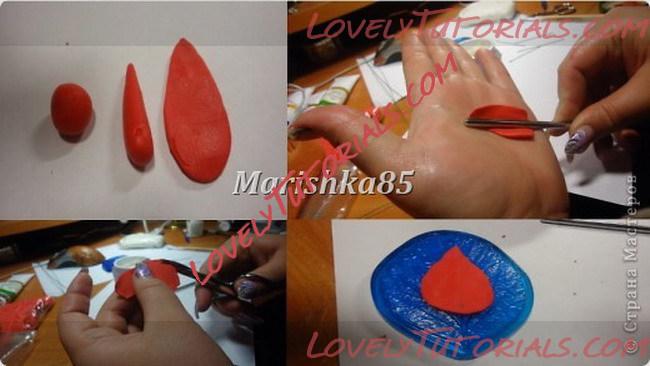
Затем берем красную массу. У меня была уже окрашенная масса. если хф белый. то красим масл красной краской.
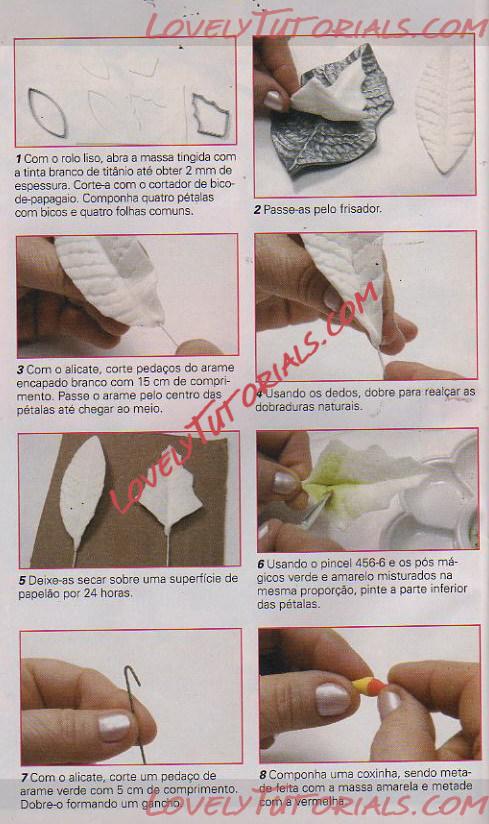
Формируем шарик, затем каплю, каплю расплющиваем и начинаем раскатывать стеком хф. Раскатав до нужной толщины, вырезаем лепесток, 3-4 маленьких, 3-5 побольше.
Название: 4.jpg
Просмотров: 0

Размер: 58.6 Кб


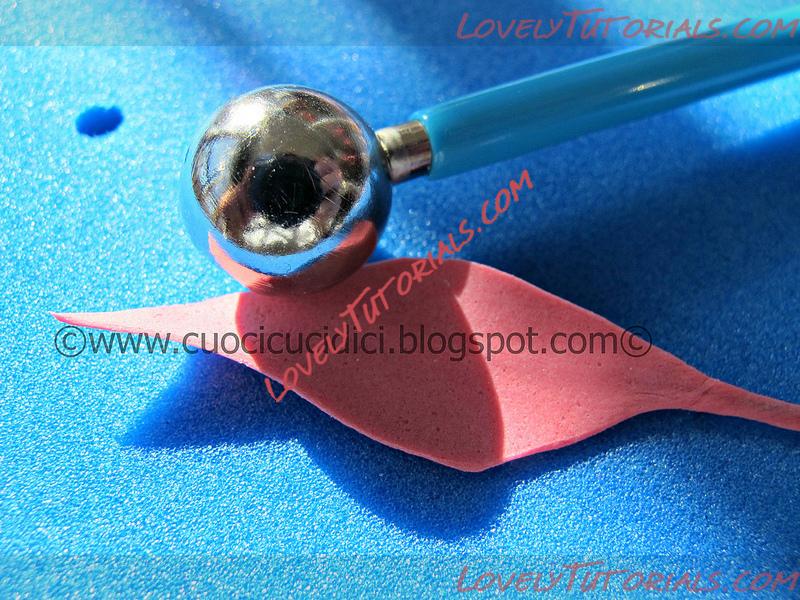
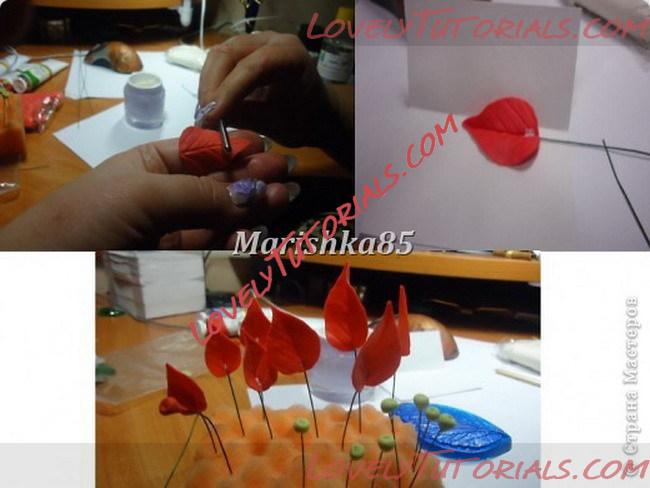
Раскатав и вырезав один лепесток, фактурим его на молде. затем подкатываем края.
затем берем кусочек проволки длиной около 5 см. макаем его в клей, и вставляем в основания лепестка, и прижимаем слегка это место.
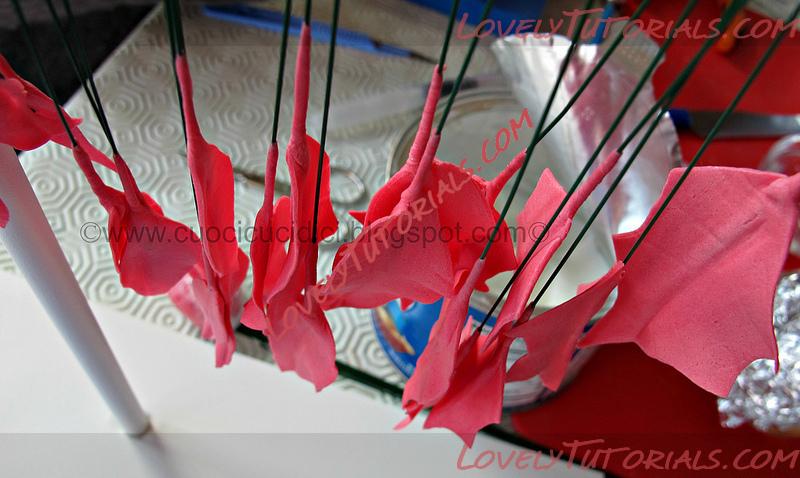
придаем лепестку нужную форму и отправляем в сушку, я приспособилась подсушивать на согнутом пополам листе бумаги. Когда форма подсохла, ставим сушится к нашим тычинкам. И ждем)
Название: 5.jpg
Просмотров: 0

Размер: 64.6 Кб


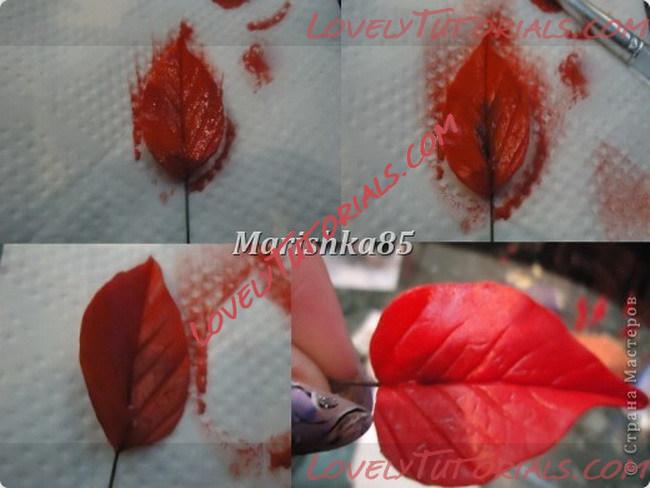
Прошло н-ое кол-во времени, для каждого хф по разному. из флораля можно приступать к тонированию и через час, а из самоварного хф надо ждать когда лепесток наполовину хотя бы высохнет.
выдавливаем немного краски в...хм.. крышечку железную, добавляем капельку разбавителя и начинаем волшебство. сначала прокрашиваем красной. затем тонируем(читай хорошо проводим сухой кистью), затем добавляем совсем капелюську фиолетовой краски и размазываем сухой кистью. повторяем эту процедуру с каждым лепестком.
Название: 6.jpg
Просмотров: 0

Размер: 64.8 Кб


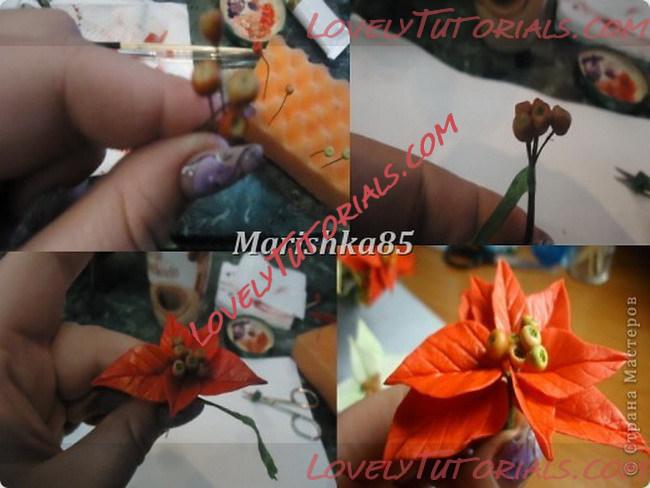
Тонируем тычинки: кисточкой к-рой мы тонировали лепестки(к-рая сухая) чпокаем все тычинки, сверху тычинки немножечко чпокаем кистью с зеленой краской.
приступаем к сборке: тычинки собираем вместе, и обматываем тейп-лентой, затем по одному добавляем лепестки, делаем красоту) и до конца проволочек обматываем тейп ленту. Я еще при обмотке часть проволочек обрезаю. чтобы палочку стала тоньше в конце, но можно так не делать.
Название: 7.jpg
Просмотров: 0

Размер: 70.0 Кб


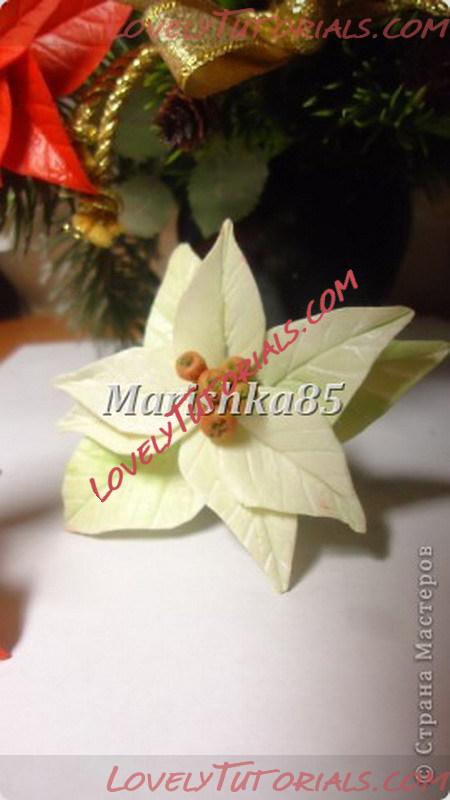
Вот мои красавицы пуансетии)
Название: 8.jpg
Просмотров: 0

Размер: 88.8 Кб


белая тонируется сначала белым, а потом немножечко зеленым.
Название: 9.jpg
Просмотров: 0

Размер: 62.6 Кб


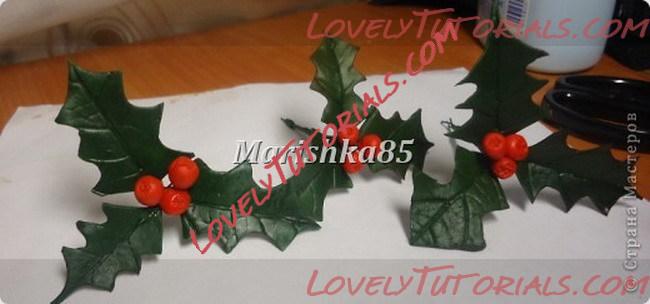
Бонус для досмотревших до конца:Еще одни э-ты новогодних венков-поддубки.
катаем шарик, потом колбаску, колбаску расплющиваем и раскатываем. вырезаем листик. подсушиваем, затем делаем красоту с помощью зеленой краски(виридоновой) и немного красненькой по краям листов.
Название: 10.jpg
Просмотров: 0

Размер: 42.5 Кб
Старый 14.12.2012, 13:18
Ariana Ariana вне форума
Администратор
Регистрация: 07.09.2010
Сообщений: 7,940
По умолчанию
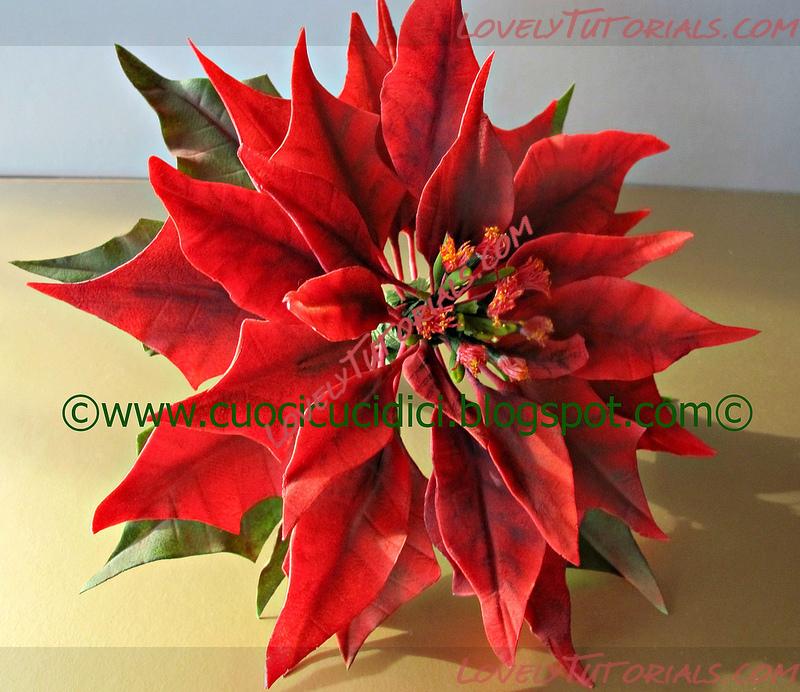
Огромная благодарность Автору Flavia за Мастер-класс

Material:

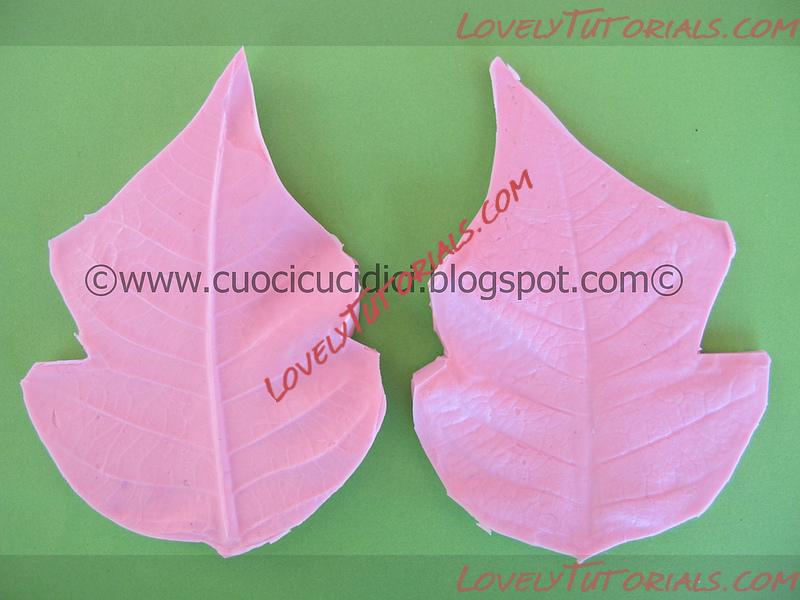
Poinsettia leaves veiners
-Gum paste (or sugar paste with added cmc) red and green
-White cotton thread
-Wires
-florist tapes
-cutter
-cell board (cake board)
-sponge for frilling
-rolling pin
-Ball-tool
-Powder colors (we use Squires Kitchen for the shades and they are excellent):
red poinsettia and poppy or ruby ​​- green foliage or green vine - blackberry-violet or chestnut brown - yellow
-egg white
-water (in a bowl)
-thin brush (to trace the veins external to the color of the leaves)
-Brush-mop (or those from makeup, to fade)
-pliers to bend and cut wire
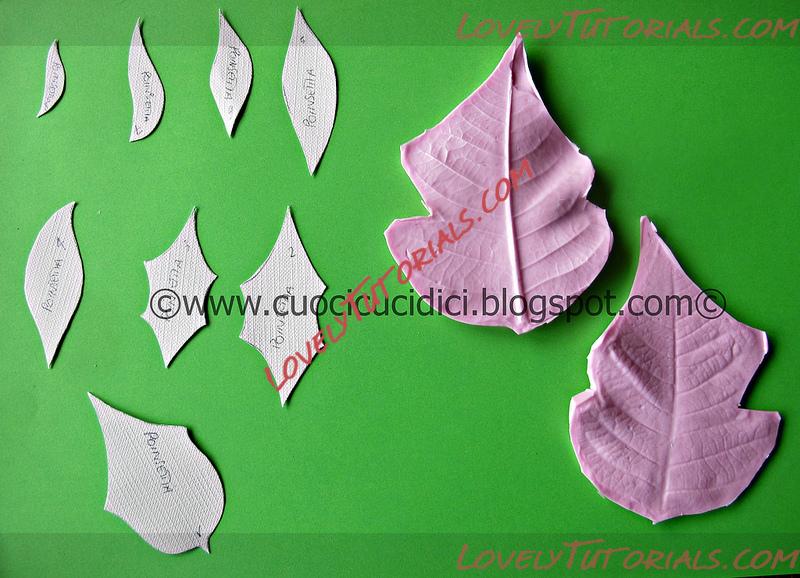
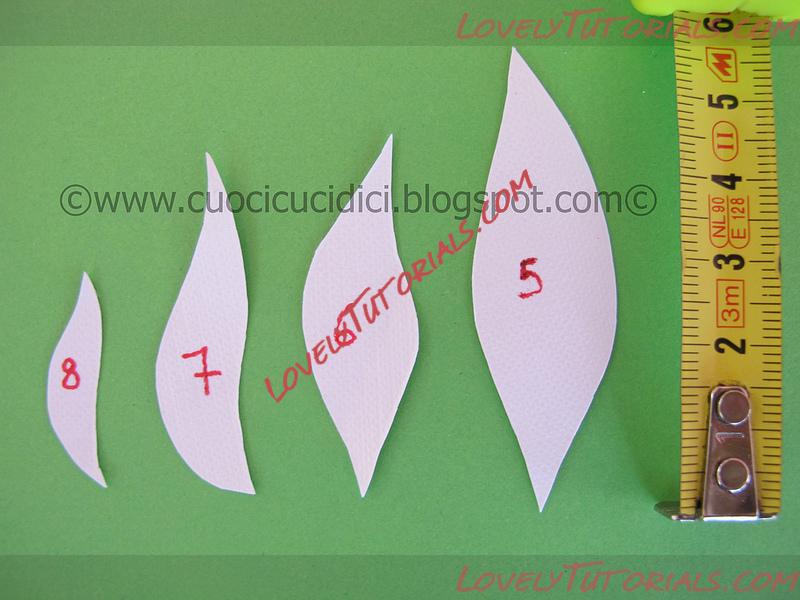
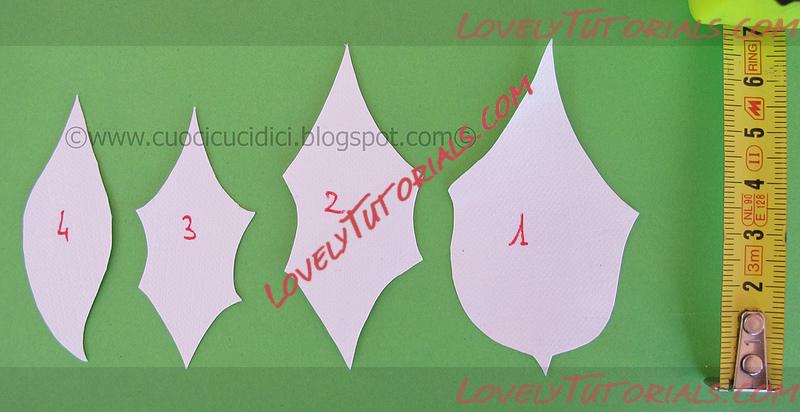
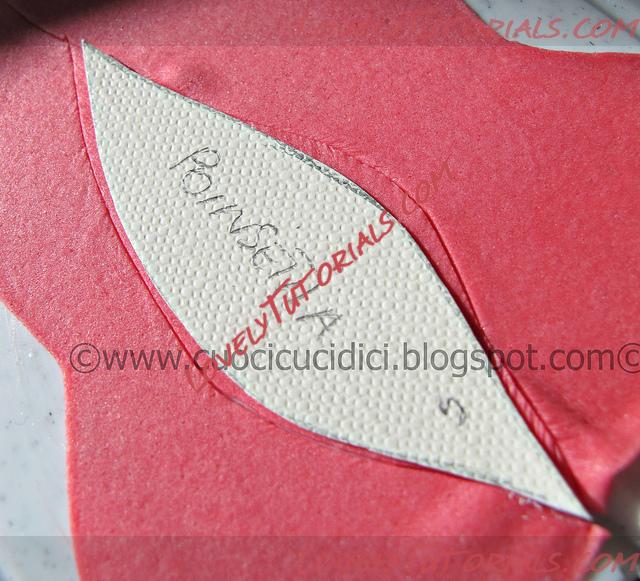
-Copied templates for petals and leaves on paper with the proportions in the photos.


-You will need all these leaves and petals:
3 petals template n.8 (red)
3 petals template n.7 (rosso)
3 petals templaten.6 (red)
3 petals template n.5 (red)
3 petals template n.4 (red)
5 petals template n.3 (red)
5 petals template n.2 (red)
5 petals template n.1 (red)
7 leaves template n.1 (green)


Grease the cell board with a veil of Crisco (or butter)
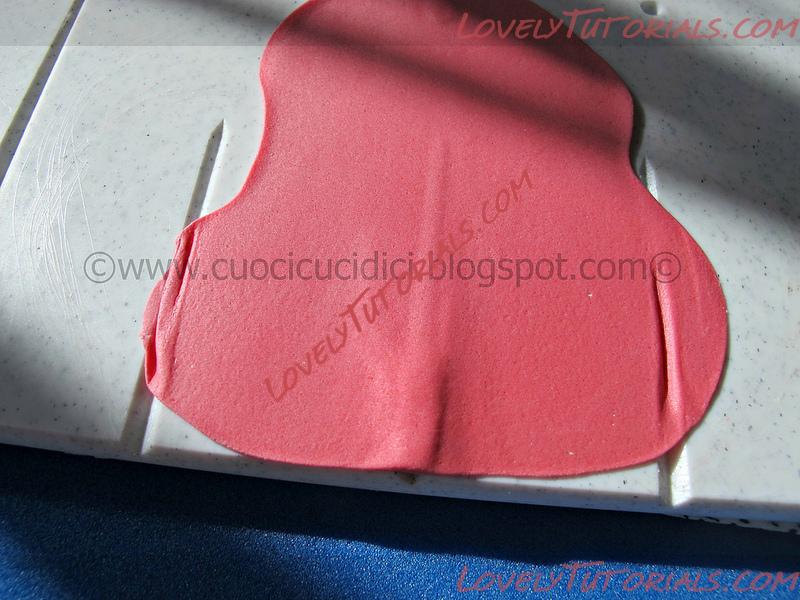
Roll out the gumpaste on the cell board.


Take one shape at a time and cut with a cutter


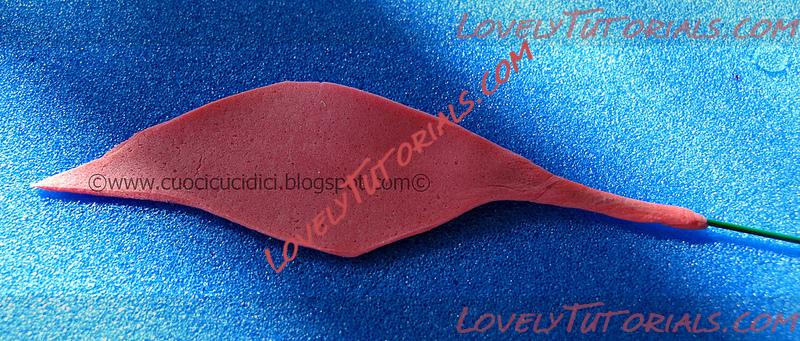
Insert the wire in the petals (the midpoint where thanks to the cell board have more gum paste)
Extend the base of the leaf gum paste or petal on the wire
Past the edges of leaves and petals with the ball tool by pressing on the sponge
Press these petals or leaves in veiner
Put to dry upside down hanging
Meanwhile, prepare the pistils with cotton thread (these will serve 8)


Wrap the wire on the 4 fingers


Stop with the wire in the wire 5 points equidistant


Tighten the tenaglietta the leaders of the wire


Cut the cotton threads


Close the "crest" of cotton threads with the aid of the florist tape


With a small thin brush past a little 'egg white tufts of cotton on


Color them red


Spend points in the yellow powder color (or better if you have the yellow granular pollen)


Then prepare the other pistils in gum paste (these will serve 13)
(Wet the tip of the wire with water, put a ball of gum paste on it , and "stretch it" on the wire, with the cutter make a little sign for the length). Shade with amix of green and a pinch of chestnut brown the 13 pistils in gum paste.


Color the tip with yellow.


Color with the mop brush all red petals with red color , and green leaves with green.
Shoot the petals and red with a thin brush using a mixture of powder colors (green, brown and a touch of violet) rehearse the veins.


With the mop rehearse the center of the leaves and then all gradient from the center outward.


For the green leaves, proceed as for the red petals, but using a mix of brown and violet and blackberry, while the edges rehearse and shaded red.


Be the piles of pistils:
4 consist of two pistils with the wire and one with gum paste
3 consist of three pistils green gum paste


At this point it passes the assembly of the flower. Add the bunches of the pistils, close with florist tape, join the three smaller petals (8) and then to grow, filling in from time to time all around, remembering each leaf or petal added to stop everything with florist petals. Finish with the seven green leaves.

Название: 8234581965_575c928551_c.jpg
Просмотров: 1

Размер: 329.9 Кб

Название: 2.jpg
Просмотров: 0

Размер: 279.8 Кб

Название: 3.jpg
Просмотров: 1

Размер: 223.0 Кб

Название: 4.jpg
Просмотров: 0

Размер: 154.7 Кб

Название: 5.jpg
Просмотров: 0

Размер: 201.3 Кб

Название: 6.jpg
Просмотров: 0

Размер: 288.1 Кб

Название: 7.jpg
Просмотров: 1

Размер: 259.3 Кб

Название: 8.jpg
Просмотров: 0

Размер: 358.1 Кб

Название: 9.jpg
Просмотров: 0

Размер: 443.1 Кб

Название: 10.jpg
Просмотров: 0

Размер: 206.3 Кб
anlegget, anläggning, ano novo, armado de los ramos, arranjo, artesanatos passo a passo, atatürk çiçeği, atatürkbloem of poinsettia, augalas, año nuevo, babbo natale, baking, bico-de-papagaio, biljka, bitki, blad, blade, blader, bladeren, blatt, bloem, bloemen, blomma, blommor, blomst, blomster, blume, blumen, blüten, blütenpaste, blätter, boeket, boneco de neve, bonhomme de neige, bouquet, božič, buchet, buket, bukett, bukiet, buquê, cake decorating, cake decorating techniques, candy cane, capodanno, cardeal, cerâmica plástica, chimney, chiodi di garofano, christmas, christmas tree, christmas tree toys, christmas wreath, clavo de olor, clous de girofle, cloves, cold porcelain, cold porcelain figurines, cold porcelain flowers, confeitando bolos, csokor, cukrinių gėlių, curso completo de flores, curso de modelado, cvijet, cvijeće, decoracion de pasteles, decoración de tortas, decorare le torte, decorazioni, deer sleigh, deko fondant, dekorace na dort, dekoracija, dekoracije, dekorasyon, dekorácie, doncella de la nieve, el abc del armado de ramos, estrela-do-natal, euphorbia pulcherrima, fanciulla di neve, feriado, ferie, feuille, feuilles, fiestas, fimo, fimo flowers, fiore, fiori, fireplace, fleurs, floare, flogistica, flor, flor de pascua, flor-do-natal, floral inspirations, flores, flores azucar, flores e folhas, flori, floristics, floristik, floristikk, floristique, florística, flower, flower paste, flowering plants, flowers, flowers on a wire, foglia, foglie, folha, folhas, folhas pintadas, fondan, fondant, fondente, fotopostup, frunze, gum pasta, gum paste, gum paste flowers, gumpaste, gumpaste flowers class, gėlė, gėlės, hand painting, handmodelliert, hat, hideg porcelán, hladno porculan, hoja, hojas, holiday, house, how to, how to make poinsettia, how tцветы на проволоке, how-to's, impianto, jak na, jul, julestjerne, kage dekoration, kagedekoration, kakebaking, kaldt porselen, kallt porslin, kalt porzellan, kar maiden, kardan adam, kasvi, kerstroos, kerstster, kolde porcelæn, koud porselein, krok za krokem, kukka, kukkakimppu, kukkia, kvetina, kvety, květina, květiny, kwiat, kwiaty, kylmä posliini, kytica, la flor de navidad, lapai, lapas, leaf, leaves, lehdet, lehti, levelek, levél, list, listí, lišće, liście, liść, lístia, lístky na drátku, making sugar flowers, mamãe noel, marshmallow, masa flexible, mazzo, mistletoe, modeling paste, modellierpaste, modelləşdirmə, modelovanie, modelování, modelowanie, montando, motivtorten, mrs claus, muñeco de nieve, natal, natale, natale 2012, navidad, nelken, neve maiden, new year, noche buena, noel, noel baba, nouvel an, novo leto, nový rok, noël, nyttår, nytår, návody a postupy, návody na květy a lístky, növény, oasis o esponja de floristeria, pap, papagaio, papai noel, paso a paso, passo a passo, passo-a-passo, pasta di zucchero perfetta, pasta flexible, pflanze, plant, planta, plante, plantes, plantă, pocelana fria, poinsettia, poinsétia, polymer clay, polymer clay flowers tutorial, porcelaine froide, porcelana fria, porcelana fría, porcellana fredda, postup klinček, postupak za ukrasavanje, praznik, puokštė, pupazzo di neve, qar qız, rabo-de-arara, ramo, rastlina, rece porţelan, red, renas e trenó, rododendron, rostlina, roślina, santa, santa claus, santa stuck in the chimney, schneeflöckchen, schneemann, schritt für schritt anleitung, schritt-für-schritt, sculpey flowers, sculpting, silvester, simple, snemand, snow, snow maiden, snowman, sněhulák, sněhurka, sock, soğuk porselen, stamens, steg for steg, stella di natale, step by step, step-by-step, stocking, strauß, studený porcelán, styrofoam, sugar cane flowers, sugar cloves, sugar flower, sugar flowers, sugar flowers for cake decorating, sugar paste flowers, sugarcraft, sugarpaste, sukker art, svátek, tatil, technique utilisée fleurs en sucre cru, tecnicas de decoracion, tecniche, thai flowers, torte, torte decorate, torten dekorieren, torti, toys, trin for trin, trin-for-trin, trinn for trinn, tutorial, tutorijal, ukrašavanje torti, uputstvo za dekoraciju, urlaub, vacances, vacanze, vianočná ruža, virág, virágok, vánoce, vánoční hvězda, wedding cake, wedding cakes, weihnachten, weihnachtsstern, white, wilczomlecz nadobny, wire, xmas, yaprak, yapraklar, yeni il bayram, yeni yıl, zimno porcelany, zuckerblumen, ดอกไม้, सजा केक, मॉडलिंग, ポインセチア, モデル, árvore de natal, çiçek, çiçek modelleme, 一品紅, šalto porceliano, řezy s postupem na vánoční hvězdu, 建模, 裝飾蛋糕, 진달?, κρύα πορσελάνη, μπουκέτο, αζαλέα, αλεξανδρινό, αστέρι της βηθλεέμ, λουλούδι, λουλούδια, ποϊνσέτια, τα φύλλα, φύλλα, φυτό, дед мороз, дзед мароз, дядо коледа, дід мороз, коледа, кветка, кветкі, квіти, квітка, как слепить, каляды, керамическая флористика, куст, новий рік, новогодние елочные игрушки из мастики, новогодняя елка, нова година, новы год, новый год, гвоздика, полимерная глина, полевые цветы, пошагово, природа, праздник, празник, пуансеттия, мк, моделиране, молочай красивейший, молочай прекрасний, майстер-класи, маршмеллоу, мастика, мастер-класс, мастер-класс по лепке, азалия, азалія, букет, завод, листа, листья, листя, лепим цветы, лепка, лепка из глины, лепка из пластики, лепка цветов, ліплення, лісце, рождество, рождественский венок, рождественский цветок, рослина, растение, растения, різдво, украшение тортов, украшение торта, снеговик, снегавік, снегурочка, снежанка maiden, снежен човек, снягурка, сніговик, снігуронька, свадебный торт, свято, свята, сахарная мастика, сахарный клей, уроки прикрашання, студен порцелан, торт, фимо, флористика, флора, холодного порцеляни, холодного фарфора, холодный фарфор, халоднага фарфору, цветок, цветочная паста, цвете, цветя, цветы, цветы из полимерной глины, цветы из холодного фарфора, цветы на торт, цветы ручной работы, шаг за шагом


©2022 Lovely Tutorials
Content Relevant URLs by vBSEO