Cake Decorating Tutorials  (How To's) Tortas Paso a Paso
Cake Decorating Tutorials (How To's) Tortas Paso a Paso
Вернуться   Cake Decorating Tutorials (How To's) Tortas Paso a Paso > Figure making tutorials > Clothes, Shoes, Accessories, Jewelry
Перезагрузить страницу детские сандалики, пинетки, туфельки, сапожки, трафареты|gumpaste baby shoes tutorials,baby booties,templates
Старый 11.02.2013, 08:56
Ariana Ariana вне форума
Администратор
Регистрация: 07.09.2010
Сообщений: 7,940
По умолчанию самодельная подставка для сушки сандаликов


МК ЗДЕСЬ -TUTORIAL HERE
Старый 24.02.2013, 10:19
Ariana Ariana вне форума
Администратор
Регистрация: 07.09.2010
Сообщений: 7,940
По умолчанию
Огромная благодарность Автору за Мастер-класс

Название: 1.jpg
Просмотров: 2

Размер: 73.3 Кб

Название: 2.jpg
Просмотров: 0

Размер: 40.8 Кб
Старый 17.04.2013, 20:16
Arianka Arianka вне форума
Администратор
Регистрация: 05.03.2013
Сообщений: 698
По умолчанию

МК ЗДЕСЬ - TUTORIAL HERE
Старый 17.04.2013, 21:16
Arianka Arianka вне форума
Администратор
Регистрация: 05.03.2013
Сообщений: 698
По умолчанию


МК ЗДЕСЬ - TUTORIAL HERE
Старый 20.04.2013, 18:42
Arianka Arianka вне форума
Администратор
Регистрация: 05.03.2013
Сообщений: 698
По умолчанию
Огромная благодарность Автору Abeer за Мастер-класс


Название: cake-with-fondant-baby-shoes-1.jpg
Просмотров: 4

Размер: 68.1 Кб
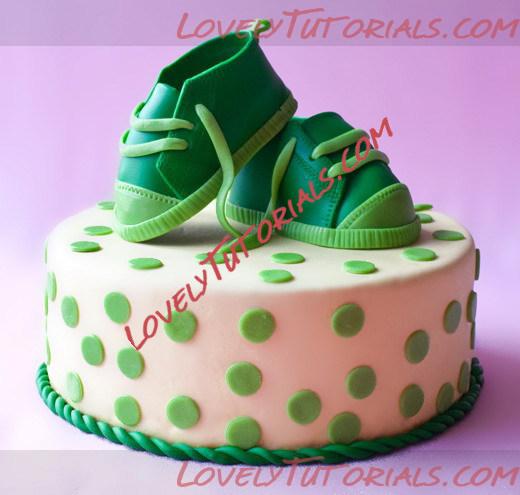
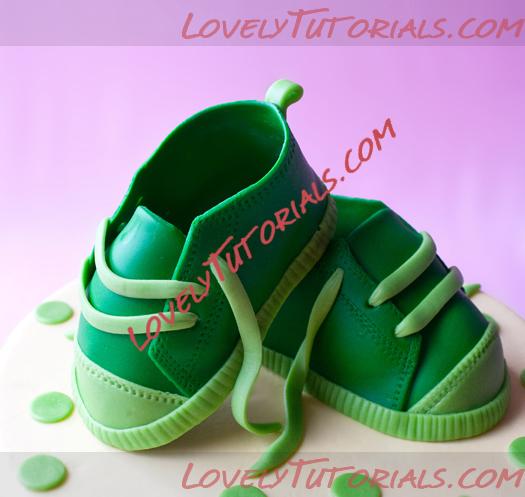
About 6 months ago, I tried to make fondant baby shoes for the first time and it ended in a complete disaster! lol
However, I learnt from those mistakes and I am now very excited to share the perfect template and tutorial for making these cute baby sneakers
You can make them in any color you like and these shoes are perfect as cake toppers for baby showers or any baby event.
Название: cake-with-fondant-baby-shoes-3.jpg
Просмотров: 1

Размер: 179.8 Кб
This is what I used:
Rolling pin
Dark green 50/50 OR gum paste (please read the note below)
Light green 50/50 OR gum paste (please read the note below)
Shortening
Wilton’s tip#3
Quilting tool (to create stitch marks)
Knife
Fondant cutter or pastry cutter (preferably with a small wheel)
Gum paste glue or corn syrup (I used corn syrup)
Templates (Please print them from Step 1)
Paintbrush
Wax paper or parchment paper
Clay extruder
Cotton balls
Large circle cutter from the Wilton circle cutter set
Small shot glass or a small bottle
Toothpicks
Scissors
NOTE: I prefer using 50/50 to make these shoes because it does not dry as fast as gum paste. Sometimes, I even make 70/30 (70% gum paste and 30% fondant). Using 50/50 or 70/30 gives me a chance to go back and fix something I am not happy with.
When I use gum paste, I have to work very fast because the pieces start drying quickly and if I make a mistake, I cannot go back and fix it easily. Also, the fast drying time can lead to cracking and breaking of pieces while I am trying to assemble the shoe.
I don’t like using only fondant because it takes very long for the shoes to dry…about a week or more. I am too impatient to wait that long…lol. Also, since fondant, especially marshmallow fondant (which is what I use) is softer than gum paste or 50/50, it’s very hard for the pieces to hold their shape. They start bending and rolling, making it very difficult to assemble these shoes.
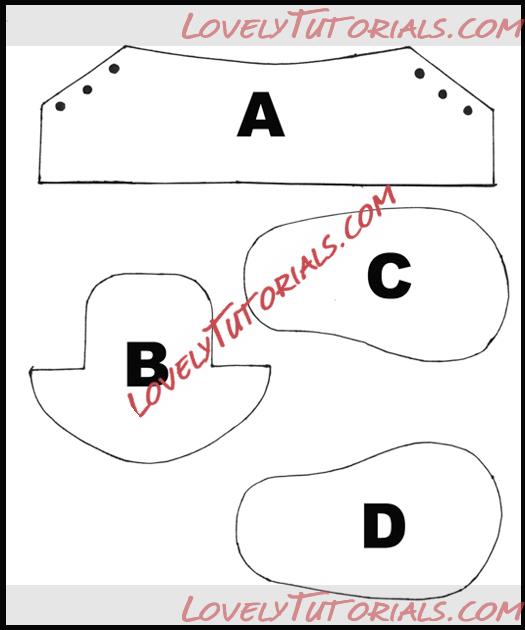
Step 1:
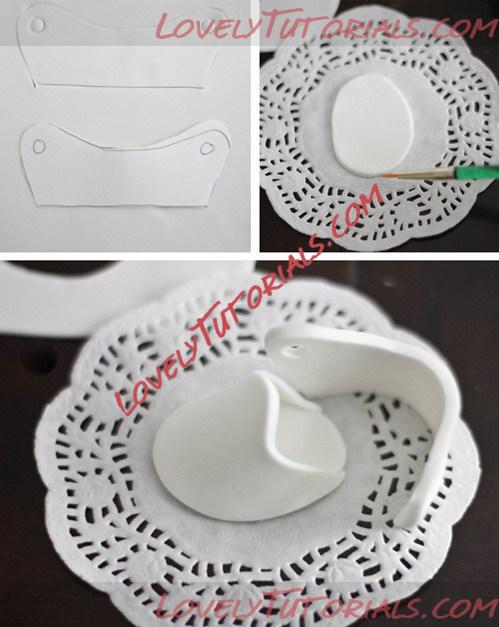
Print this image with the shoe template. It’s good to print them on thick scrapbook paper.
Use scissors to cut out the relevant shapes
NOTE: Before you print this template, you can resize the image in Photoshop and make it bigger or smaller depending on how big or small you want your final shoes to be.
Название: cake-with-fondant-baby-shoes-3.5.jpg
Просмотров: 10

Размер: 60.3 Кб
Step 2:
Roll out dark green 50/50.
Place your templates on the 50/50 and use a fondant cutter or pastry cutter to cut out all the relevant shapes.
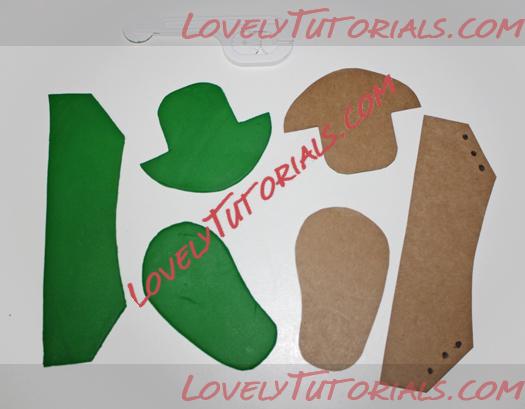
Название: how-to-make-fondant-baby-shoes-4.jpg
Просмотров: 3

Размер: 144.6 Кб
Step 3:
Use the quilting tool to create stitch marks on Piece A.
Make the stitch marks the same way I did, as seen in this picture.
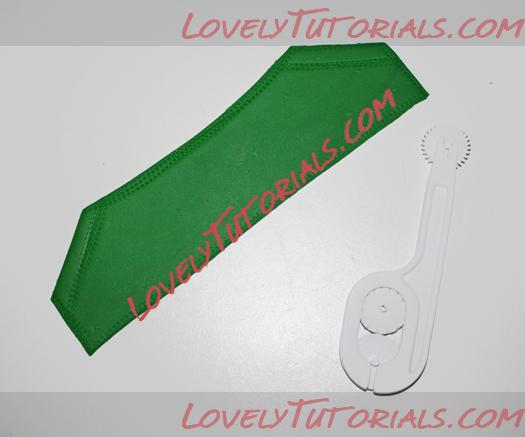
Название: how-to-make-fondant-baby-shoes-4.5.jpg
Просмотров: 3

Размер: 132.1 Кб
Step 4:
Use tip#3 to cut out three little circles around either side of Piece A.
Jiggle the tip around the hole to make it a little bigger.
Keep this piece aside and move on to the next step.
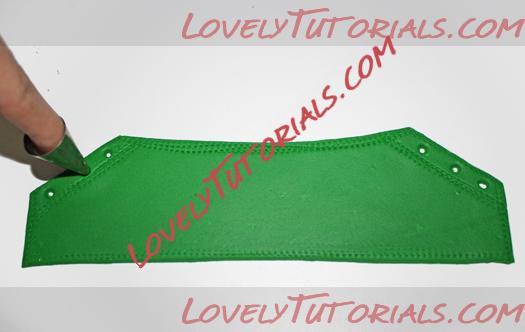
Название: how-to-make-fondant-baby-shoes-4.6.jpg
Просмотров: 3

Размер: 104.5 Кб
Step 5:
Place Piece C on a sheet of wax paper. I highly recommend making this entire shoe on a sheet of wax paper because it prevents it from sticking to your table or work surface. You can peel it off once your shoe is dry.
Brush some corn syrup halfway around the top edges, as shown in this picture.
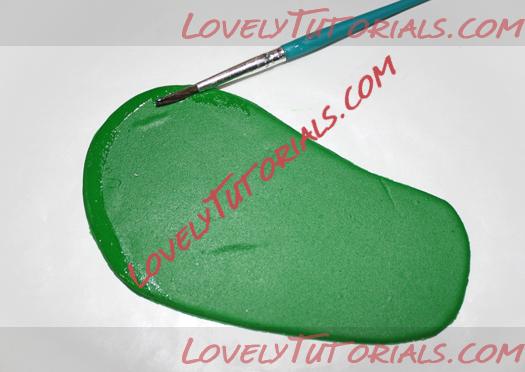
Название: how-to-make-fondant-baby-shoes-4.7.jpg
Просмотров: 1

Размер: 151.3 Кб
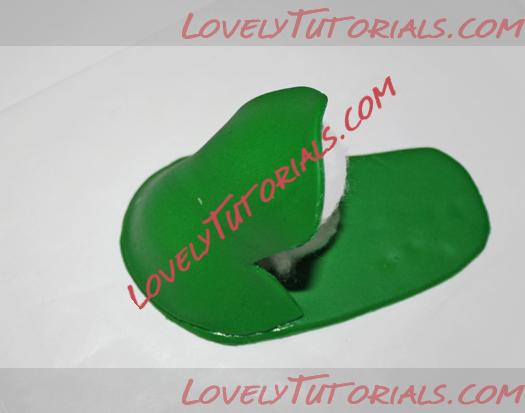
Step 6:
Stick Piece B on top of your corn syrup.
Fill the hollow space with cotton balls so that this piece holds its shape.
Название: how-to-make-fondant-baby-shoes-5.jpg
Просмотров: 0

Размер: 115.8 Кб
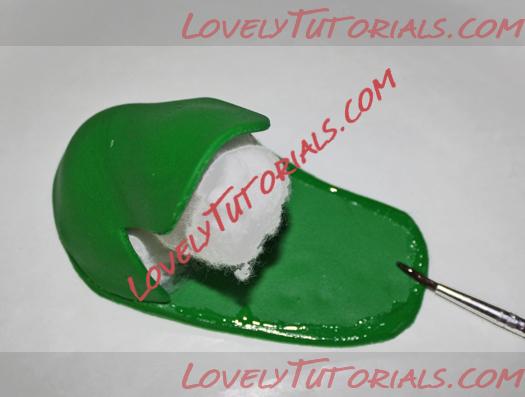
Step 7:
Now, brush some corn syrup around the remaining edge of Piece C.
Название: how-to-make-fondant-baby-shoes-6.jpg
Просмотров: 0

Размер: 131.3 Кб
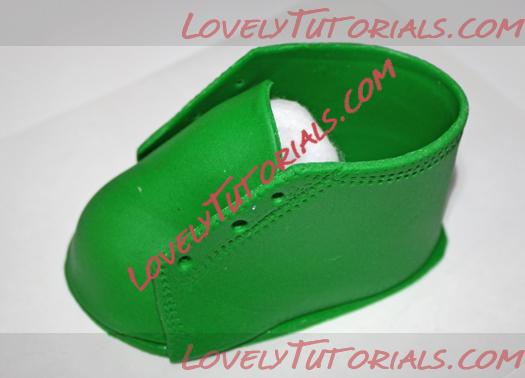
Step 8:
Stick Piece A on top of your corn syrup.
Название: how-to-make-fondant-baby-shoes-7.jpg
Просмотров: 2

Размер: 135.5 Кб
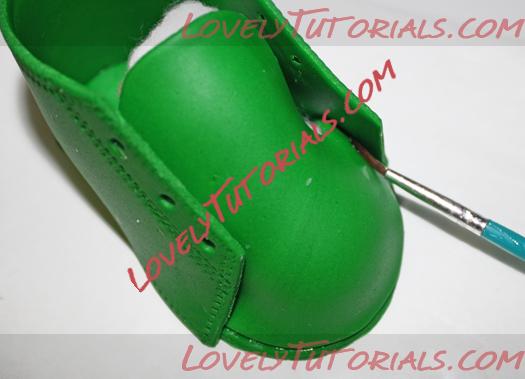
Step 9:
Brush some more corn syrup along the sides of Piece A so that it sticks to Piece B.
Название: how-to-make-fondant-baby-shoes-8.jpg
Просмотров: 2

Размер: 147.2 Кб
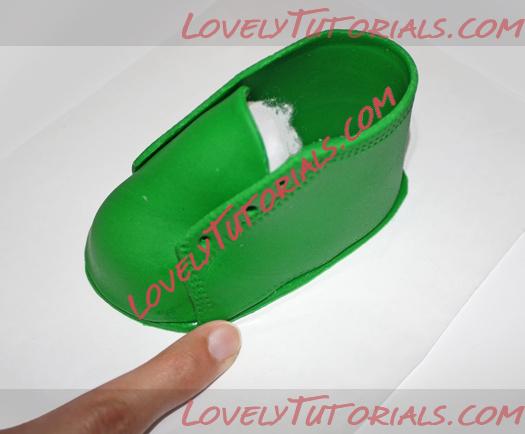
Step 10:
Use your fingers to smooth out the joint where Piece A is glued to Piece B.
Название: how-to-make-fondant-baby-shoes-9.jpg
Просмотров: 1

Размер: 143.7 Кб
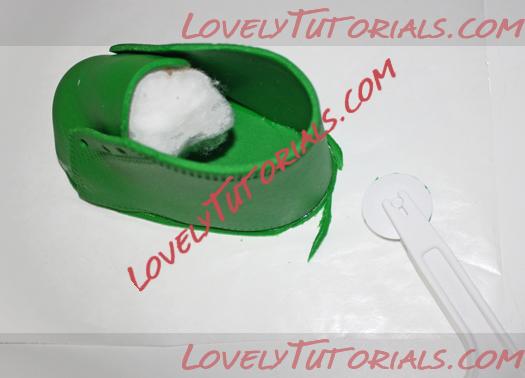
Step 11:
All this pressing and sticking of pieces makes the base of this shoe spread a little.
To fix this problem, use a fondant cutter to cut out any excess fondant near the back of the shoe.
Название: how-to-make-fondant-baby-shoes-10.jpg
Просмотров: 1

Размер: 122.2 Кб
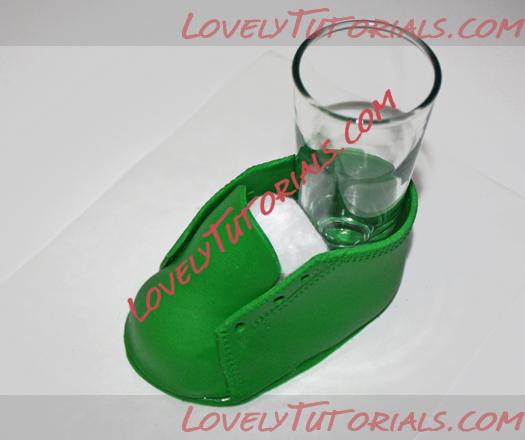
Step 12:
Fill the hollow space inside the shoe with cotton balls or a small shot glass.
If you use a shot glass, rub a little shortening on the bottom so that it doesn’t get stuck to your shoe.
Название: how-to-make-fondant-baby-shoes-11.jpg
Просмотров: 1

Размер: 142.5 Кб
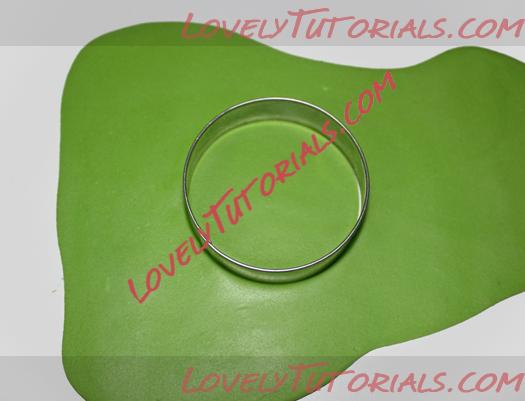
Step 13:
Roll out light green fondant
Use a large circle cutter to cut out a circle shape.
Название: how-to-make-fondant-baby-shoes-12.jpg
Просмотров: 0

Размер: 155.0 Кб
Step 14:
Roll out this circle piece a little more. It won’t look like a circle any more but that’s ok.
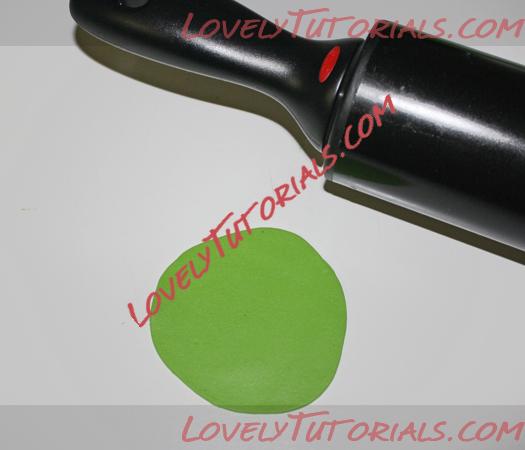
Название: how-to-make-fondant-baby-shoes-13.jpg
Просмотров: 0

Размер: 142.2 Кб
Step 15:
Use a knife to cut this circular piece in half.
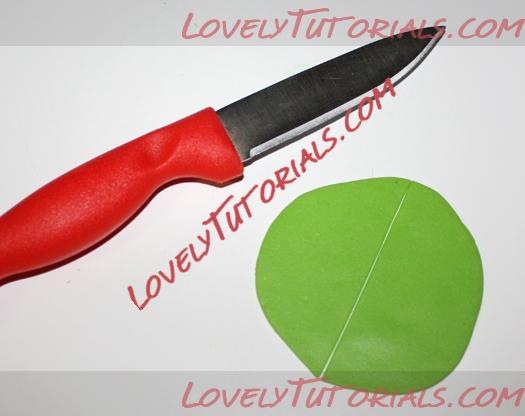
Название: how-to-make-fondant-baby-shoes-14.jpg
Просмотров: 1

Размер: 143.9 Кб
Step 16:
Brush some corn syrup on the front of your shoe and place this light green piece until it sticks into place.
Smooth it out with your fingers and cut out excess fondant by using a fondant cutter.
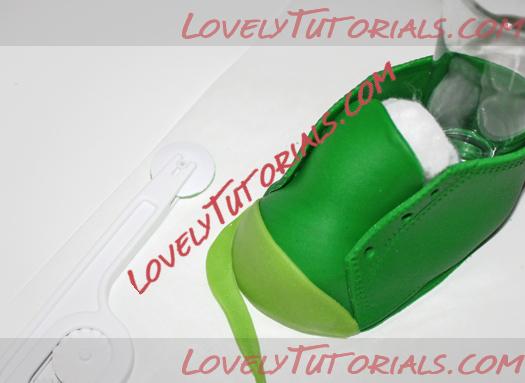
Название: how-to-make-fondant-baby-shoes-15.jpg
Просмотров: 2

Размер: 130.2 Кб
Step 17:
Once your excess fondant is cut out, the front of your shoe should be smooth just like the shoe in this picture.
Use the quilting tool to create stitch marks of top of the light green piece. I like to make double stitch marks. So, I go over the area twice.
Название: how-to-make-fondant-baby-shoes-16.jpg
Просмотров: 1

Размер: 90.5 Кб
Step 18:
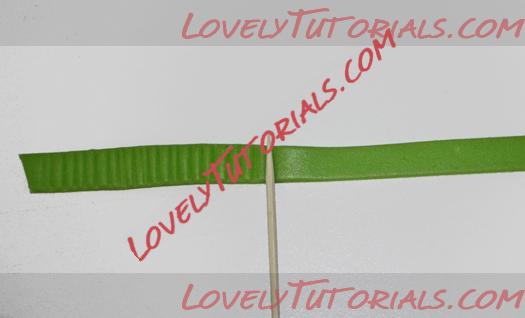
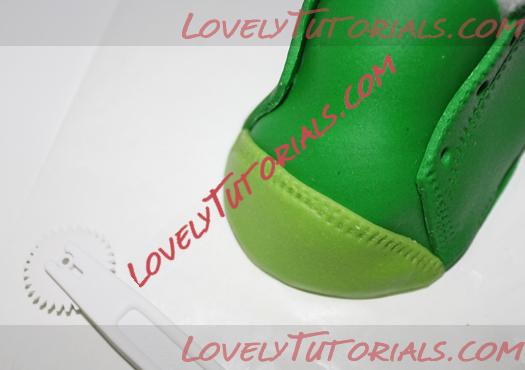
Now, cut out a long strip of light green fondant.
This strip would go around the base of your shoe. So, make it a little longer than your actual shoe.
Press your toothpick all over the strip until you have these indentations.
Название: how-to-make-fondant-baby-shoes-17.jpg
Просмотров: 0

Размер: 126.4 Кб
Step 19:
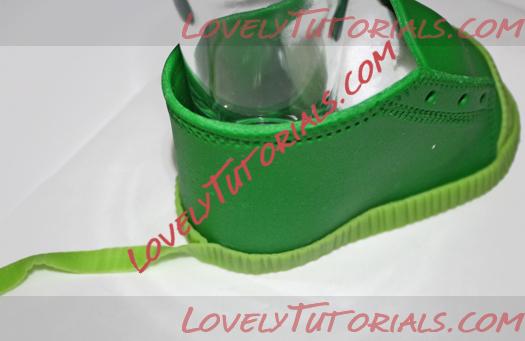
Brush corn syrup around the base of your shoe and stick the green strip.
You will have excess near the back.
Название: how-to-make-fondant-baby-shoes-18.jpg
Просмотров: 0

Размер: 127.3 Кб
Step 20:
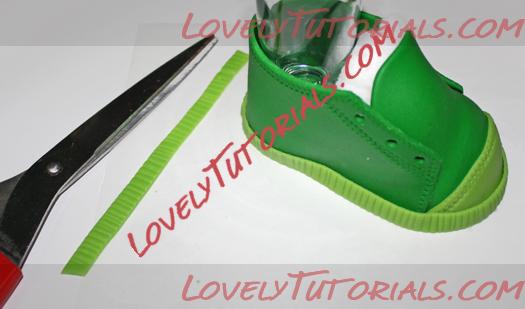
Cut out the excess strip with scissors and smooth out the joint with your fingers.
Название: how-to-make-fondant-baby-shoes-19.jpg
Просмотров: 1

Размер: 122.0 Кб
Step 21:
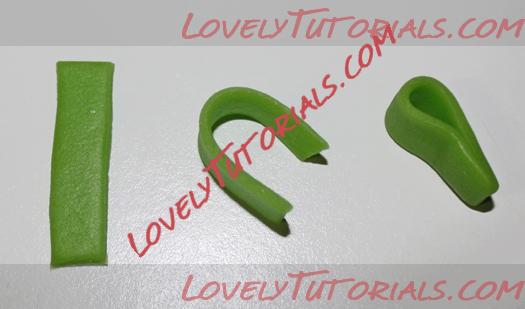
Most sneakers have a small loop near the back.
To make this loop, cut out a small light green strip of 50/50.
Bend it and then press the bottom when the two ends meet until they stick into place.
Название: how-to-make-fondant-baby-shoes-20.jpg
Просмотров: 0

Размер: 115.3 Кб
Step 22:
Stick this little loop near the back of your shoe using very little corn syrup.
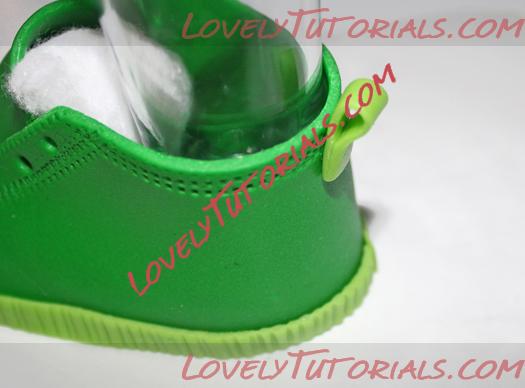
Название: how-to-make-fondant-baby-shoes-21.jpg
Просмотров: 1

Размер: 151.8 Кб
Step 23:
To make laces, use a clay extruder with a rectangular plate.
Push out strips of light green 50/50.
Cut the strips according to the length between the two holes on your shoe.
Use your fingers to roll the ends of each piece of lace until it’s a little “pointy.”
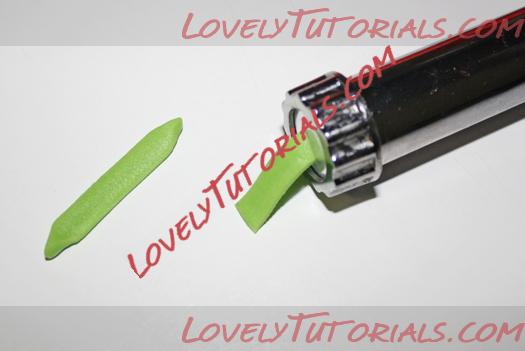
Название: how-to-make-fondant-baby-shoes-22.jpg
Просмотров: 1

Размер: 108.4 Кб
Step 24:
Brush some corn syrup in the holes.
Then use a toothpick to push the laces into the holes. They don’t have to go all the way in but it should still look like the lace is inside the hole.
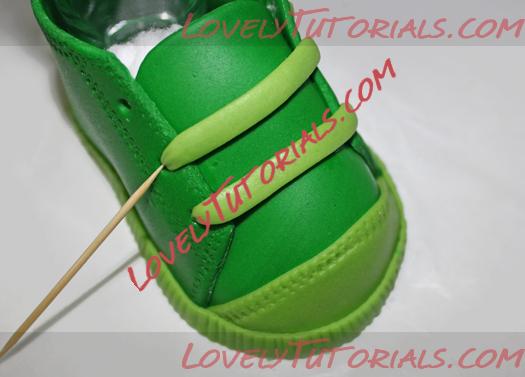
Название: how-to-make-fondant-baby-shoes-23.jpg
Просмотров: 1

Размер: 153.6 Кб
Step 25:
You can make your laces tied up in a bow but I decided to leave my final laces hanging freely from the shoe.
To do this, brush some corn syrup in the holes.
Use your clay extruder to make 2 long strips and push each strip into the final hole and then let them just hang from the sides of the shoe.
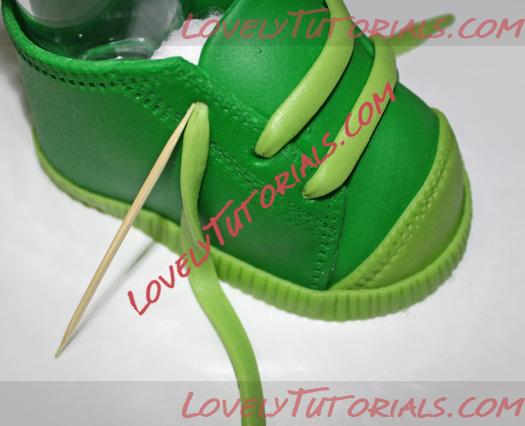
Название: how-to-make-fondant-baby-shoes-24.jpg
Просмотров: 2

Размер: 178.9 Кб
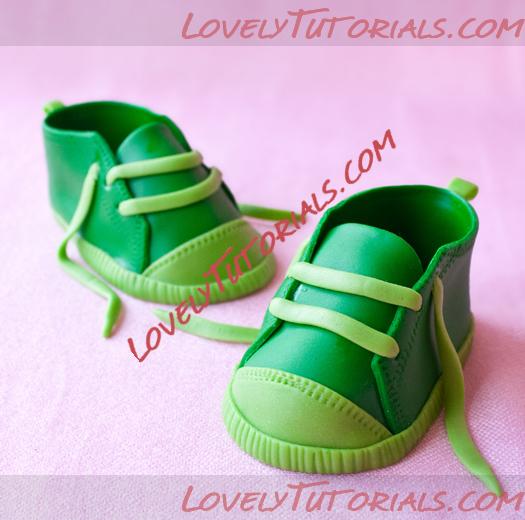
Your left shoe is ready. Allow it to dry for 48 hours.
Repeat these steps for the right shoe now.
Название: how-to-make-fondant-baby-shoes-25.jpg
Просмотров: 0

Размер: 215.3 Кб
Here are some more details of this cake:
- The shoes are resting on top of an 8×3 round chocolate cake.
- The cake is covered in buttercream icing and yellow marshmallow fondant.
- I also cut out little green fondant circles and stuck them randomly all over the cake to create a polka dot effect.
- The border around the base of the cake is made by twisting 2 ropes of green fondant. I used gum paste glue to stick it in place.
Старый 20.04.2013, 21:13
Arianka Arianka вне форума
Администратор
Регистрация: 05.03.2013
Сообщений: 698
По умолчанию
Огромная благодарность Автору Jo Kavo за Мастер-класс
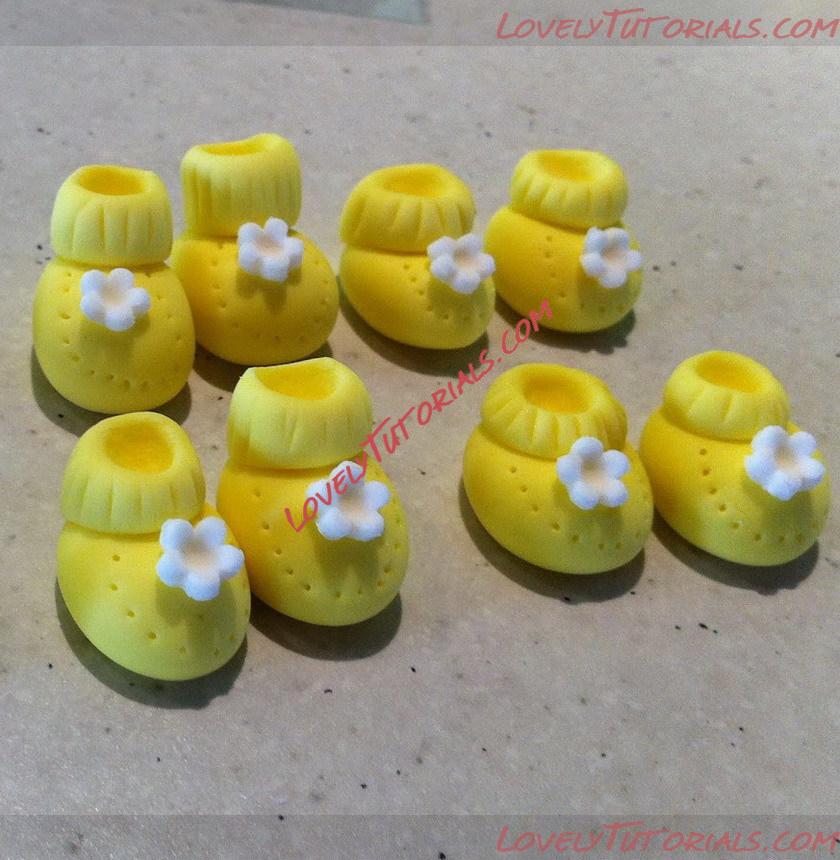
Fondant Baby Booties Tutorial


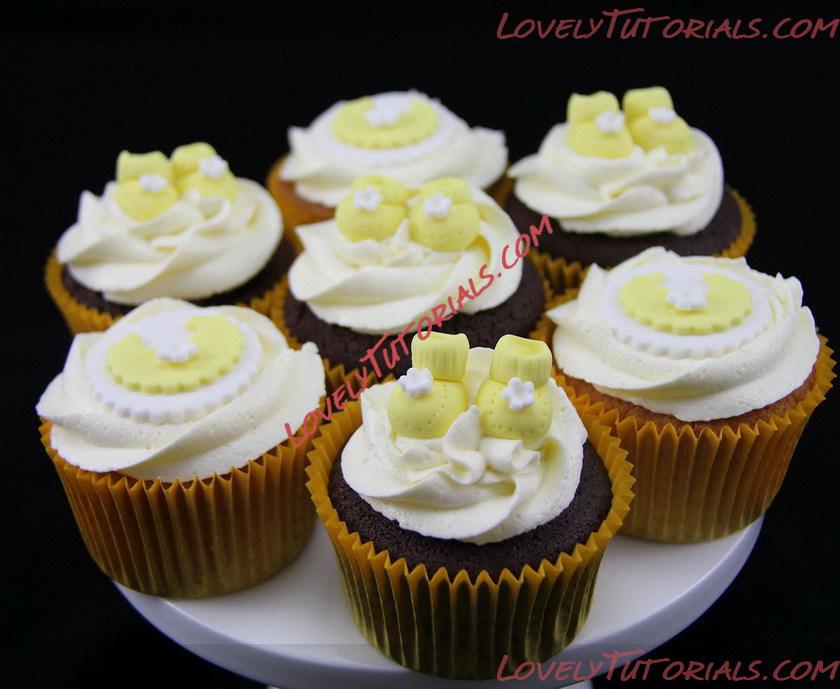
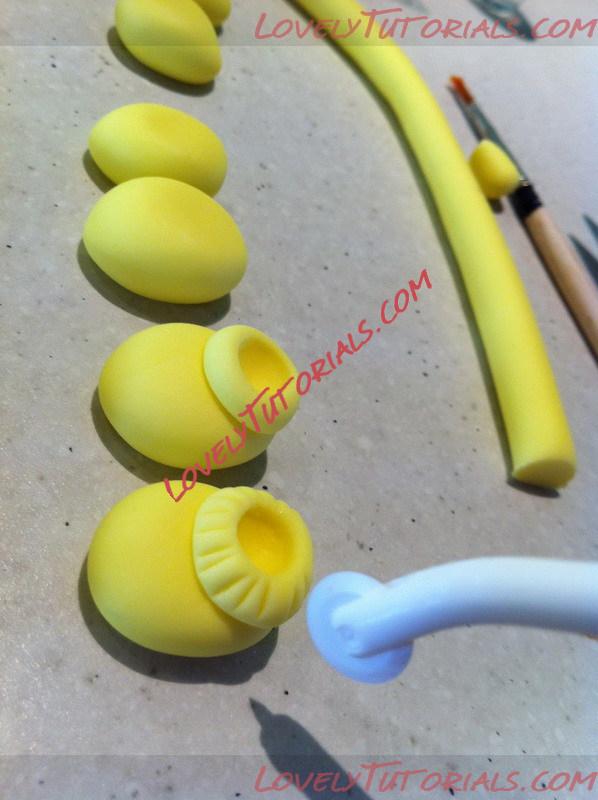
I have been promising this one, and have taken all the pictures, so I thought I need to sit down at put it together. Here is my method of making these cute little fondant booties which can be used on baby shower cupcakes, or on a cake.

Название: 1.jpg
Просмотров: 2

Размер: 116.1 Кб


You will need:
- fondant & cmc / or gumpaste
- small 5 petal blossom cutter
- toothpick
- small craft brush


Let's get started!!
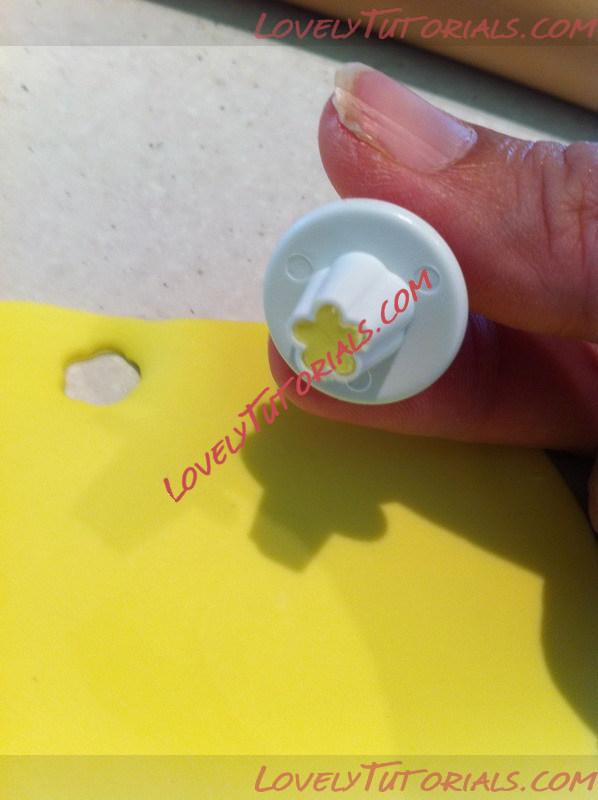
I like to make the white blossoms first, so they are a little dry by the time I want to put them on the front of the booties...so let's start there. (sorry the fondant is yellow in the picture)

Название: 2.jpg
Просмотров: 1

Размер: 76.5 Кб
Roll out your fondant until it is very thin, then use your five petal blossom cutter to cut tiny blossoms, then leave these to dry slightly while you make your booties.


Название: 3.jpg
Просмотров: 0

Размер: 122.5 Кб


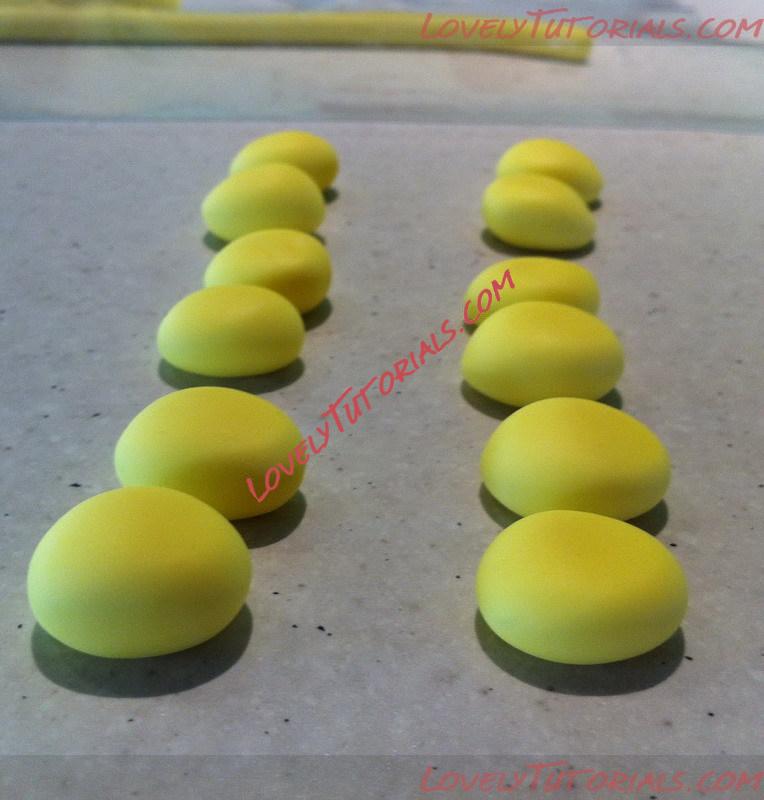
Roll out balls of fondant, then flatten one side slightly. For these booties, each ball was a little larger than a pea.


Название: 4.jpg
Просмотров: 0

Размер: 113.2 Кб

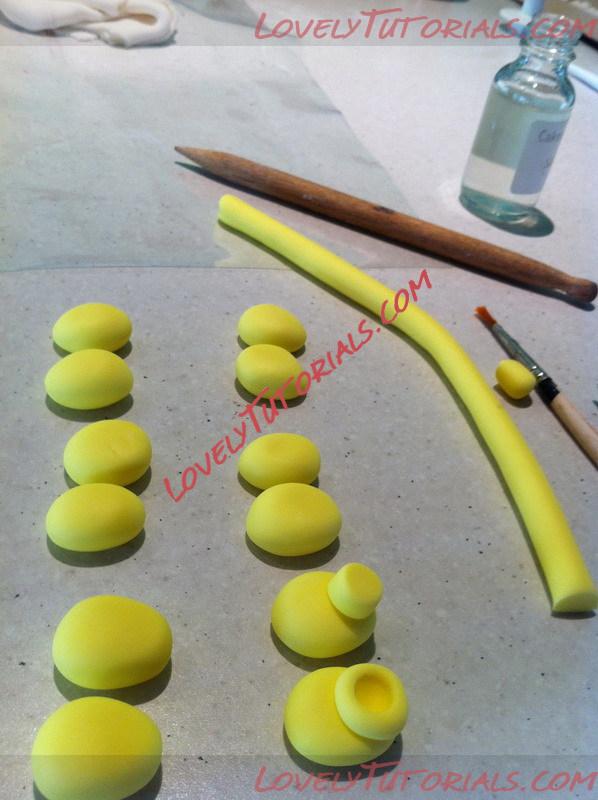
Roll out your fondant into a long snake, then cut two pieces just under 1cm long. (the thickness and the length of these will change depending on the size of your booties. Using your paint brush, paint on a tiny bit of water to adhere the two pieces together.


Название: 5.jpg
Просмотров: 0

Размер: 104.1 Кб


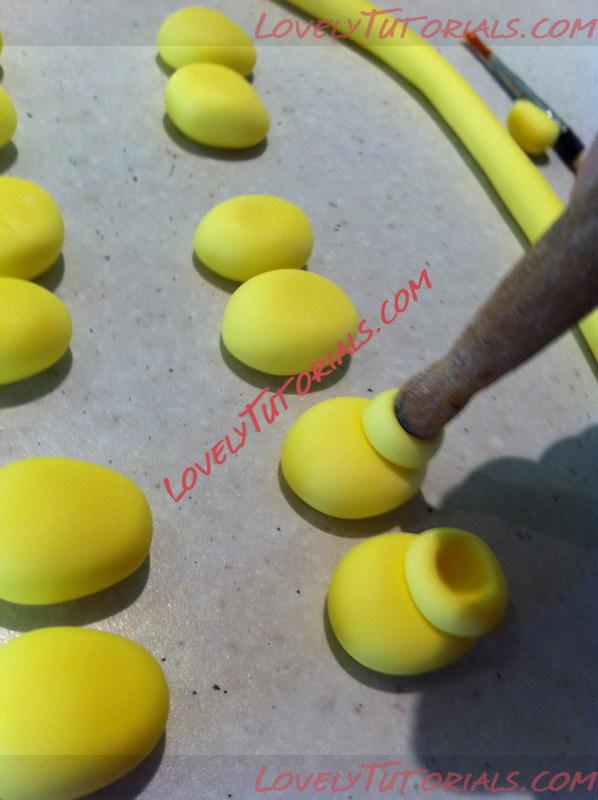
Using a balling tool, the end of a chopstick, or even your little finger press down to make an indent.


Название: 6.jpg
Просмотров: 0

Размер: 102.7 Кб

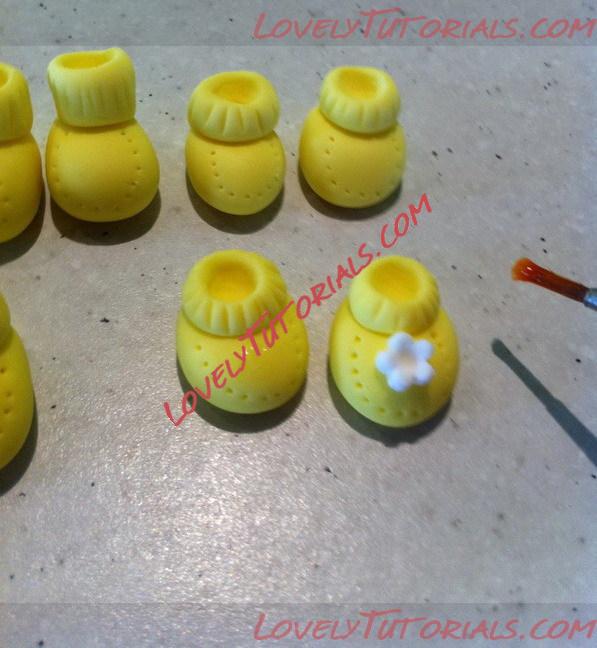
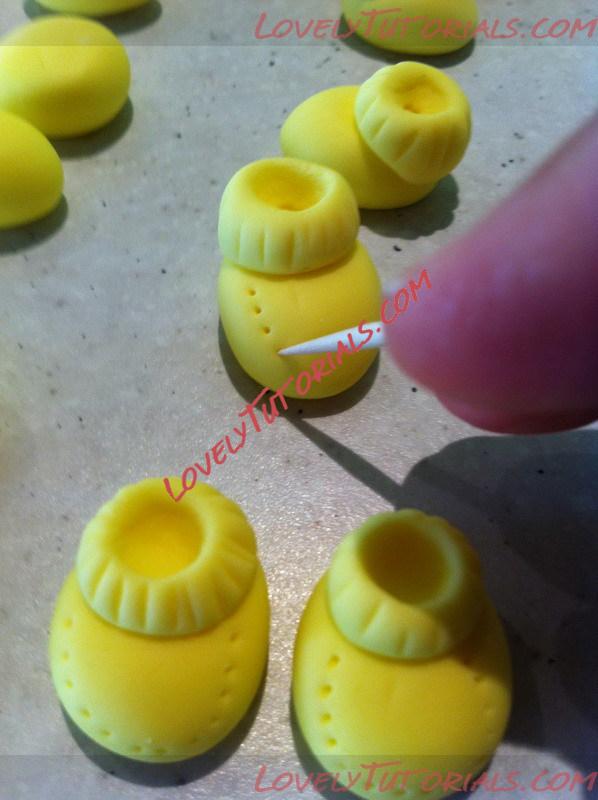
I used a cutting wheel tool here, but I have made these booties again, and used the toothpick (which worked better) to make little indents around the "sock" part of the booties.


Название: 7.jpg
Просмотров: 0

Размер: 104.9 Кб

Now use your toothpick to make little dots in a u shape around the front of the booties.


Название: 8.jpg
Просмотров: 0

Размер: 103.8 Кб

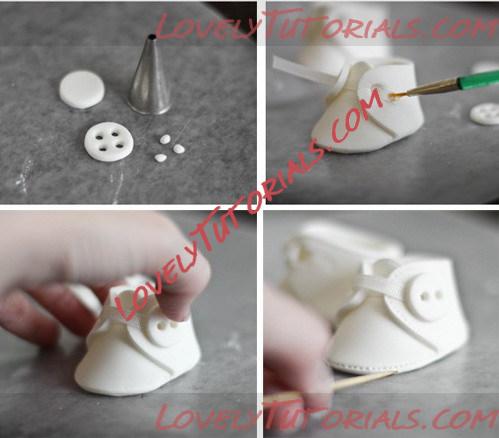
Paint a tiny bit of water onto the centre of your bootie, then glue on your blossom.


Название: 9.jpg
Просмотров: 2

Размер: 196.8 Кб
Старый 09.05.2013, 20:47
Arianka Arianka вне форума
Администратор
Регистрация: 05.03.2013
Сообщений: 698
По умолчанию


3d figures, addım-addım təlimat, adım, adım adım yönergeler, artesanatos passo a passo, baby shower, ballerina baby shoes, bemutató, birthday cake, biscuit, bolando bolos, bolos decorados, cake decorating, cake decorating techniques, cake decorating tools, cake topper, cake toppers, cake tops, cerâmica plástica, character figures, characters, children's cake, cold porcelain, confeitando bolos, curso de modelado, decoracion de pasteles, decoración de tortas, decorada en fondant, decorare le torte, decorazioni, deko fondant, dekorace na dort, dekoracija, dekoracije, dekorasyon, dekorácie, detské topánočky, especializada em modelagem de biscuit, fender, figur kager, figuras, figure making tutorials, figuren, figures, figurice, figurice od fondana, figurine on the cake, figurines, figurinhas, figurky, figúrky, figür modelleme, fimo, fixando a cabencinha, flower paste, fondan, fondant, fondente, fondente di zucchero, fotopostup, foundant, gebak, glazuur, gum pasta, gum paste, gumpaste, gumpaste baby shoes tutorial‏, gumpaste figures dekorácie, hand-made, handmade, high top baby shoes, how to, how-to's, instrucţiuni, instrukcijas, instrukcje, itty bitty shoes, jak na, kage dekoration, kagedekoration, kakebaking, kid's shoes template, kimono baby shoes, korak, korak za korakom navodila, korak-po-korak upute, koristeet ja koristelu, krok, krok po kroku, krok za krokem, krok-za-krokem, la modélisation, las instrucciones, las técnicas, le tecniche, les techniques, lukie, marcipanové figurky, marshmallow, marsipanfigurer, masa flexible, master-class, master-klasse, master-klasy, meistras klasės, metodikas, mistr třídy, modelado, modelado de zapatitos de bebé, modelagem, modelando a barriga, modelando a cabencinha, modelando a perninha, modelando as maozinhas, modelando o cabelinho, modelando o corpinho, modelando os bracinhos, modelando os pezinhos, modelare, modelerte figurer, modeling, modeling paste, modeliranje, modellazione, modelleme, modellering, modellieren, modellierpaste, modelling, modelling past, modelləşdirmə, modelovanie, modelování, modelowanie, molde del zapatito de bebe, moldes para hacer zapatitos de bebe, motivtorten, návod, opplæringen, orelhas, ozdoby, pamoka, pap, pas, pas-cu-pas, paso, paso a paso, passo, passo a passo, passo-a-passo, passo-passo le istruzioni, pasta de goma, pasta de miel, pasta flexible, pasta laminada, patron botitas de bebe, patron zapatito de bebe, pintura dos olhos, pocelana fria, polymer clay, postupak za ukrasavanje, pravljenje figurica za torte, pâtisserie, předměty z marcipánu, ruffled baby shoes, sandále, scarpine passo-passo, schmelzend, schritt für schritt anleitung, schritt-für-schritt, schritt-für-schritt-anleitungen, sculpting, sewing & crafts tutorials for baby, shower cake topper, slip on baby shoes, soggetti, souvenirs, stap, stap-voor-stap, stap-voor-stap instructies, steg for steg, steg-för-steg-instruktion, step, step by step, step-by-lépésre, step-by-step, step-by-step instructions, styrofoam, sugarart baby booties, sugarcraft, sugarpaste, suikerglazuur, technieken, techniken, techniki, techniky, technikák, techniques, tecnicas de decoracion, tecniche, tehnici, tehnike, teknikker, teknikler, telgopor, topo de bolo, topo do bolo, topos de bolo, torte, torte decorate, torten dekorieren, torti, trin, trin for trin, trin-for-trin, trin-for-trin instruktioner, trinn, trinn for trinn, trinn-for-trinn-instruksjoner, tutorial, tutoriale, tutorias, tutorias/ideas para decorar los bizcochos, tutoriel, tutorijal, técnicas, udžbenik, ukrašavanje torti, uputstvo za dekoraciju, zuckerfigürchen, zuckermasse, सजा केक, ट्यूटोरियल मास्टर वर्ग, कदम, कदम दर कदम निर्देश, तकनीक, मॉडलिंग, モデル, étape, étape par étape les instructions, öğretici, 一步, 一步一步的指示術, žingsnis, žingsnis po žingsnio, 宗師級教程, 建模, 裝飾蛋糕, βήμα, βήμα προς βήμα οδηγίες, οδηγίες βήμα βήμα, παντεσπάνι art, τεχνικές, φροντιστήριο, детские сандалики, детские сапожки, детские туфельки из мастики, инструкция, как сделать, как слепить туфельки, крок за кроком, крок за крокам, покроково, полимерная глина, пошагово, пошаговые фотки, пакрокава, персонажи, миниатюра, мк, моделиране, майстор-класа урок, майстар-клас, майстер-клас, майстер-класи, маршмеллоу, мастика, мастер-класс, лепка, ліплення, ручной работы, ручная работа, украшение тортов, сахарная мастика, уроки прикрашання, стъпка, стъпка по стъпка инструкции, тапочки, техники, техника, техніка, трафарет, туториал, туторіал, тэхніка, фигурки, фигурка на торт, фимо, фігурки, фігуркі, холодный фарфор, шаг за шагом, інструкцыя, інструкція


©2022 Lovely Tutorials
Content Relevant URLs by vBSEO