Cake Decorating Tutorials  (How To's) Tortas Paso a Paso
Cake Decorating Tutorials (How To's) Tortas Paso a Paso
Вернуться   Cake Decorating Tutorials (How To's) Tortas Paso a Paso > Cake Decorating Tutorials > Barbie Doll Cake Tutorials
Перезагрузить страницу МК торт "3Д Манекен с платьем" -How to Make a Mannequin Cake with buttercream ruffles
Старый 17.03.2013, 10:24
Arianka Arianka вне форума
Администратор
Регистрация: 05.03.2013
Сообщений: 698
По умолчанию МК торт "3Д Манекен с платьем" -How to Make a Mannequin Cake with buttercream ruffles
Огромная благодарность Автору SugaryWinzy за Мастер-класс
Название: 1.jpg
Просмотров: 1

Размер: 101.8 Кб
This post is in response to a couple of requests for a tutorial on how to make a mannequin cake. This is just one way to make a mannequin cake, and I should more aptly say, this is how I make a mannequin cake. I’ve been wanting to do this for a while, but I’ve been so busy lately.


Название: 2.jpg
Просмотров: 1

Размер: 74.1 Кб
When I bake a cake, I often stagger the stages, so I bake the layers first, then wrap and freeze them until such time when I can give the cake project my attention for assembling and frosting. Making a mannequin cake is no exception. Sometimes it can be weeks before I can get back to it. If I plan to use a buttercream frosting, then I make the frosting the night before if I can. Otherwise, I just make the frosting the same day that I assemble the cake.


Название: 3.jpg
Просмотров: 1

Размер: 33.7 Кб
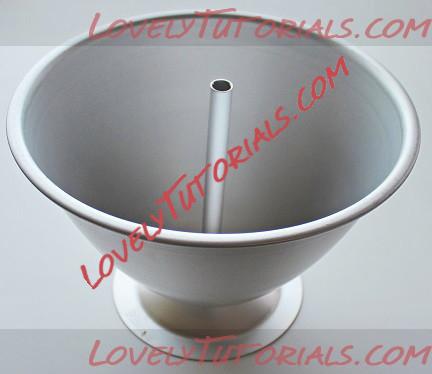
We’re almost always pressed for time, I know I am. So before I even begin I thought I would show this cake pan designed exclusively for baking the same kind of cake. It is quite simple and straightforward to use. Funny thing is, I’ve had it for such a long time but have never even used it. It’s one of those pans I have on the back burner but just never get around to it. I imagine this pan would cut down on prep time and would take care of all the cake layers in one shot.


Название: 4.jpg
Просмотров: 1

Размер: 112.5 Кб
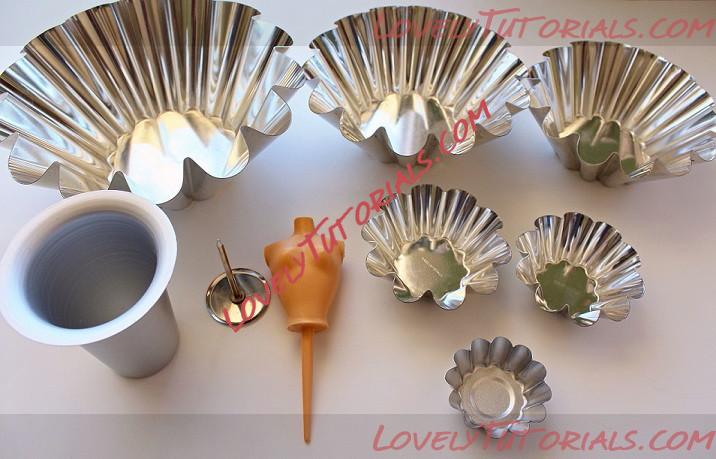
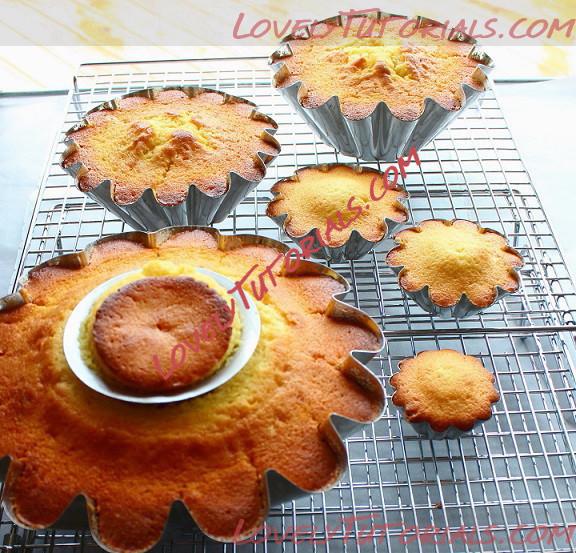
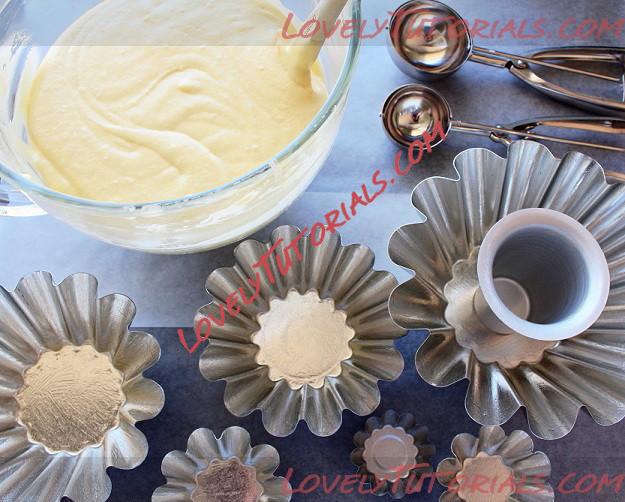
So here are the pans I use. When I saw them at Sur Le Table, I was instantly smitten because they reminded me of a skirt Actually, I think these pans are really meant for baking brioche. But never mind that. I wanted to make it work for a cake, so I first got only three pans, large, medium and small. And that is how I made this first mannequin cake. The smallest pan in front is actually a tart mold. The largest pan is a bit of a challenge as it is 8” at its widest point by 3” deep. The first time I used the large pan, to make sure the batter baked all the way through, I tried baking it with a rose nail in the center. Now a rose nail is really meant to be used for piping roses on, rather than act as a heat conductor for baking cakes. But it was all I had at the time, so, well, you use what you have and improvise. The rose nail did work, but with a little bit of a challenge in that I had to constantly watch the cake and had a hard time telling if the cake was done all the way through. So I bought a heating core, shown in the first row on the left. It’s a tool used for wider baking pans to ensure cake batter is baked all the way through the center. It definitely was more efficient as far as conducting heat. If I recall correctly, I might have ordered it from Amazon.
Название: 5.jpg
Просмотров: 1

Размер: 132.4 Кб
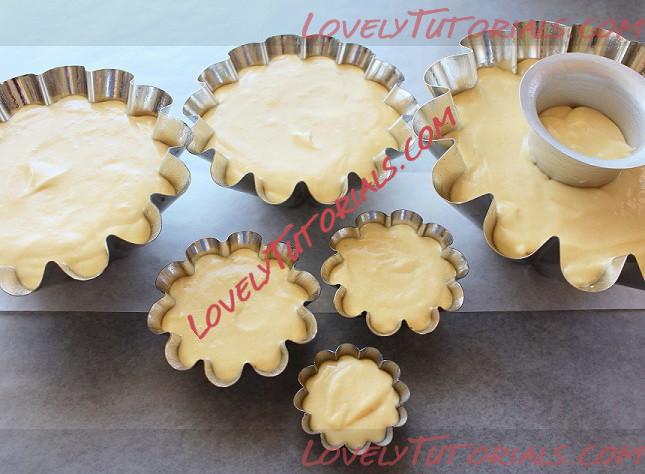
Here the pans are all ready for the batter. The heating core has to be sprayed both inside and outside. I sprayed the pans generously with non-stick cooking spray, and, with a pastry brush, evenly brushed the non-stick spray all over the surfaces to make sure all the crevices were coated. I use a cookie scoop to prevent drips and neatly fill the pans.


Название: 6.jpg
Просмотров: 1

Размер: 109.2 Кб
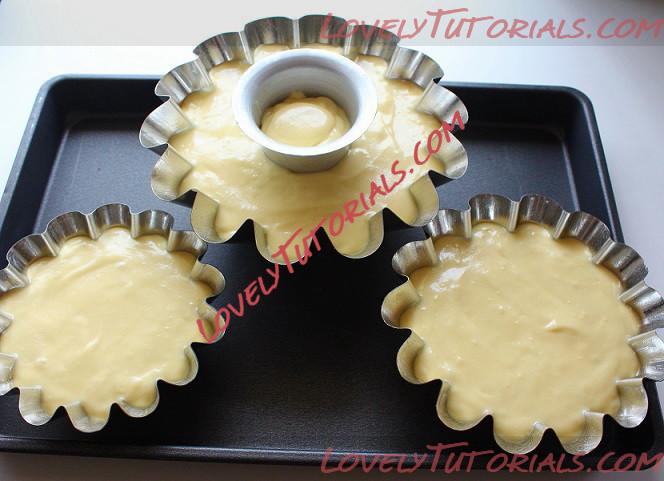
These are really more layers than I need, but since the recipe I used yields a generous amount of batter I thought I might as well bake the spare layers in case I messed up. I also could have used the extra batter to bake cupcakes, but at this point, I still didn’t know what style of skirt I was going to make, so it didn’t hurt to have extra layers.


Название: 7.jpg
Просмотров: 0

Размер: 99.0 Кб
I baked the three larger layers first and placed them on a cookie sheet. The two smaller size pans will bake ahead of the larger pan. This is how I recorded the baking times when using these pans:
  • Bake all three at 350 F for 35 minutes
  • After 35 minutes place a sheet of foil lightly on top of all three pans to prevent overbrowning
  • Bake for another 5 minutes
  • Remove 6” pan
  • Bake for another 5 minutes
  • Remove 6.5” pan
  • Bake for another 5 minutes
  • Remove 8” pan
Then place the three smaller pans in the oven and bake for about 17 – 20 minutes.


Название: 8.jpg
Просмотров: 1

Размер: 169.6 Кб
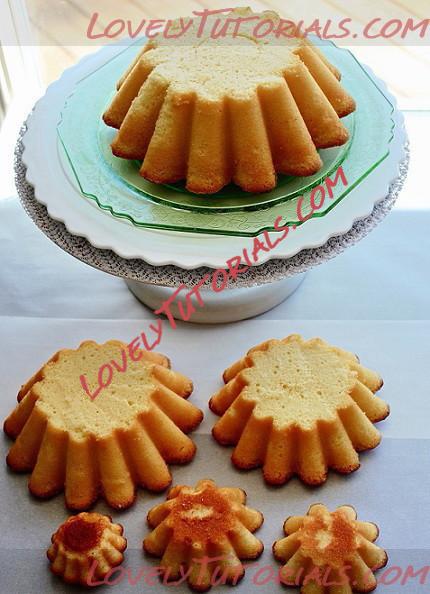
The cake layers are done and out of the oven. I have to say it was intimidating the first time I used these pans because after the layers were baked, it then just occurred to me I wouldn’t be able to run a knife all the way down the pans to remove the cakes because of the fluted sides. So I just gently ran a knife just along the top edges to loosen the cake. When I turned the pan upside down, I slightly stretched the top edges of the pan sideways, as it does have a little bit of give, enough to make the cake slide right out.


Название: 9.jpg
Просмотров: 0

Размер: 121.3 Кб
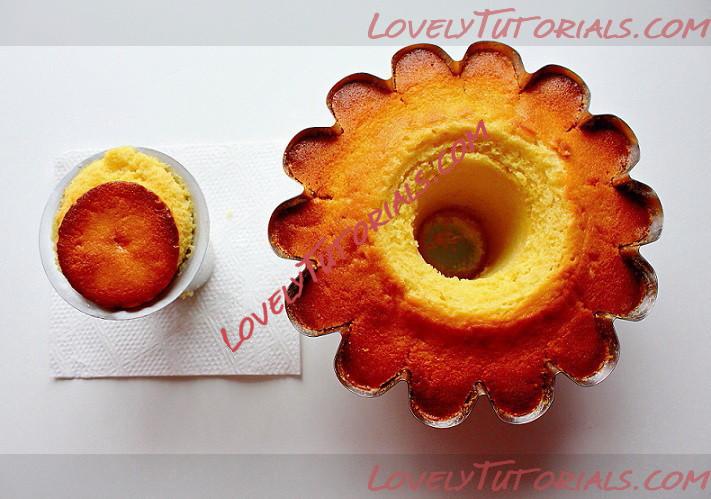
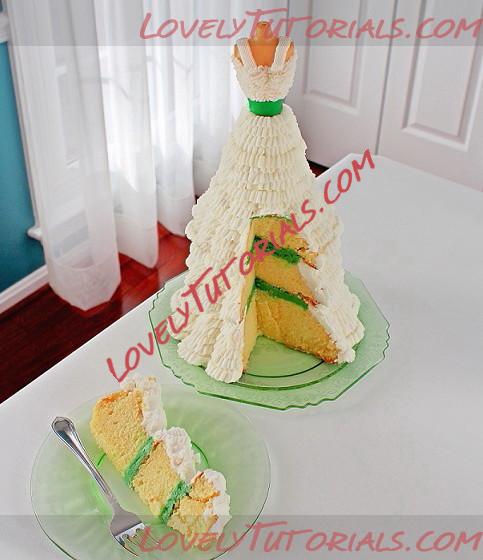
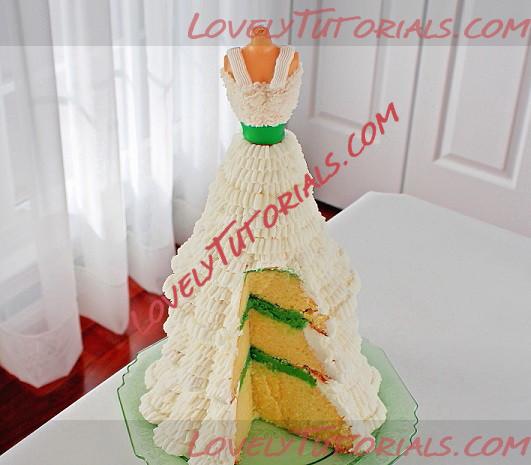
Here is the cake portion baked in the heating core, ready to be plugged into the gap of the large layer. Any unevenness in the surface can easily be trimmed off. I wrap all the layers well and freeze them. Once the cake is sliced the portion filled by the heating core blends right in with the rest of the cake and is barely discernible.


Название: 10.jpg
Просмотров: 1

Размер: 105.3 Кб
Okay, now for assembly. At this point, which layers I decide to use or decide to trim is entirely subjective. It all depends on how high I want the cake to be and what shape of dress I want to make. Here I’ve trimmed a bit off of the larger layers.


Название: 11.jpg
Просмотров: 1

Размер: 103.2 Кб
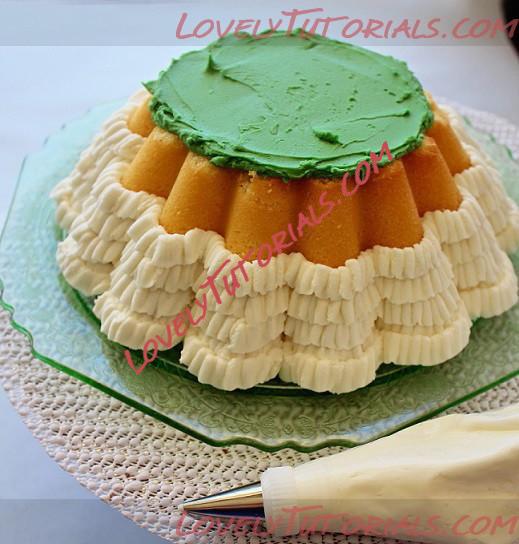
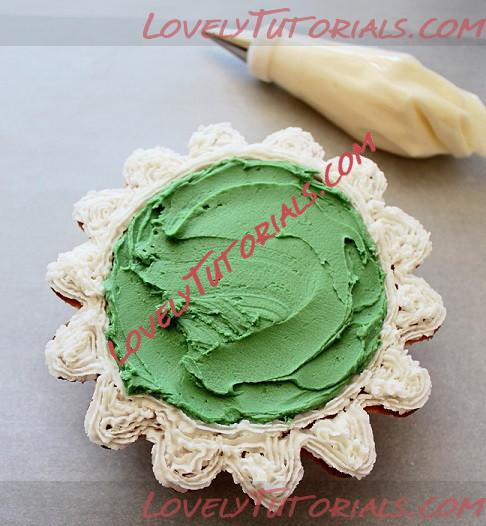
There’s really no right or wrong in frosting this cake. It’s pretty much free form. Anything goes. This time, I thought I would use tip 103 and go all around each layer piping the frosting with an up and down motion of my wrist to give the surface a different kind of texture. This is where my turntable really comes in handy. I just go round and round until the surface is covered.


Название: 12.jpg
Просмотров: 1

Размер: 90.9 Кб
Here is the underside of the next layer. I find it easier to pipe the frosting first underneath along the edges. Not sure why I added some more green filling here since I had already filled the center of the bottom layer. I sometimes do things without giving much thought. I place this directly on top of the bottom layer with the wide side down and narrow side up. Then again, I pipe frosting all around the second layer. I repeat the same steps and continue to stack the layers. I used a total of five for this cake, so that left me one small unused cake layer.


Название: 13.jpg
Просмотров: 1

Размер: 153.8 Кб
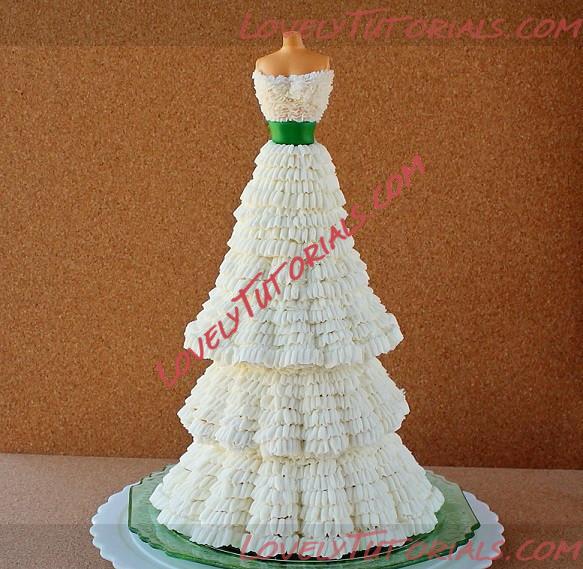
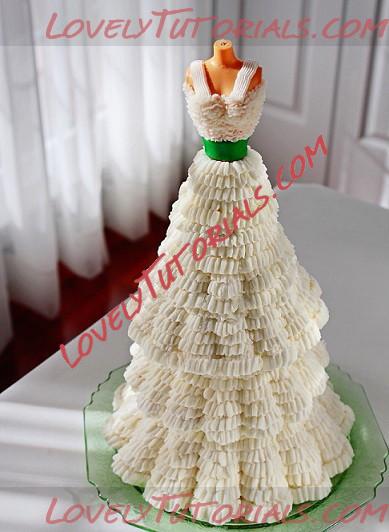
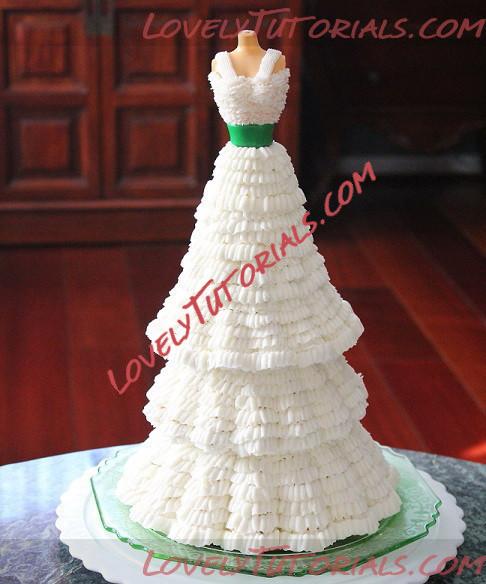
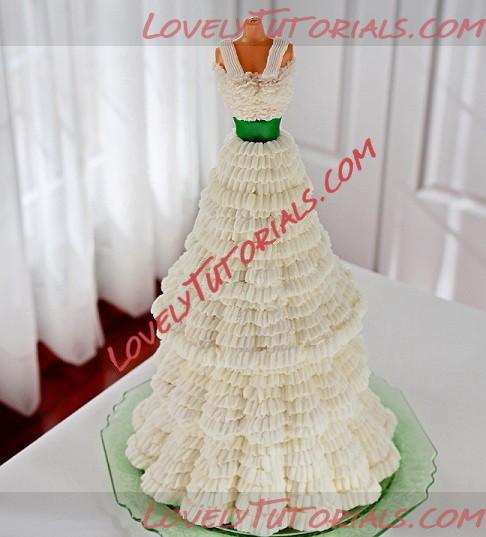
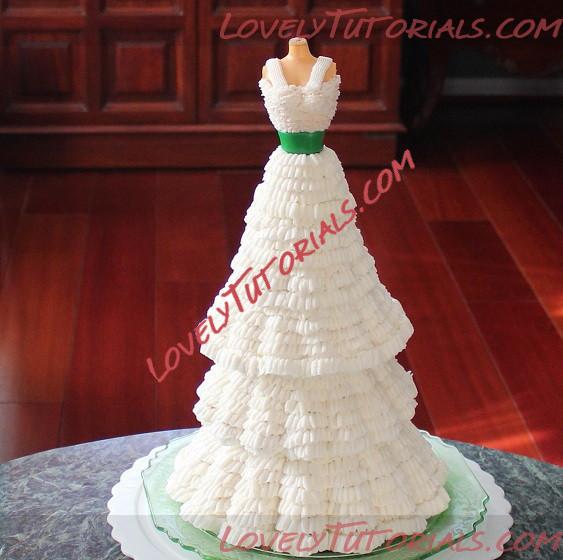
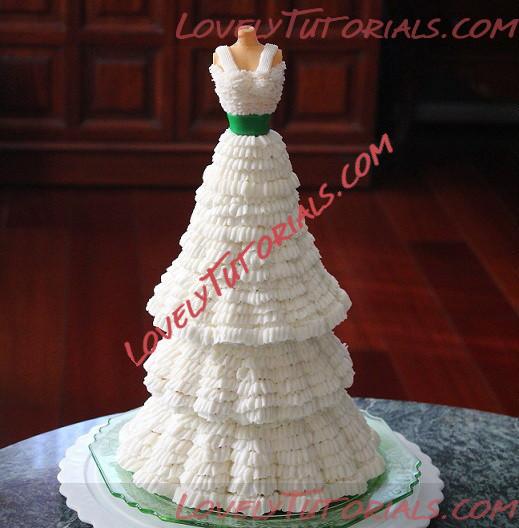
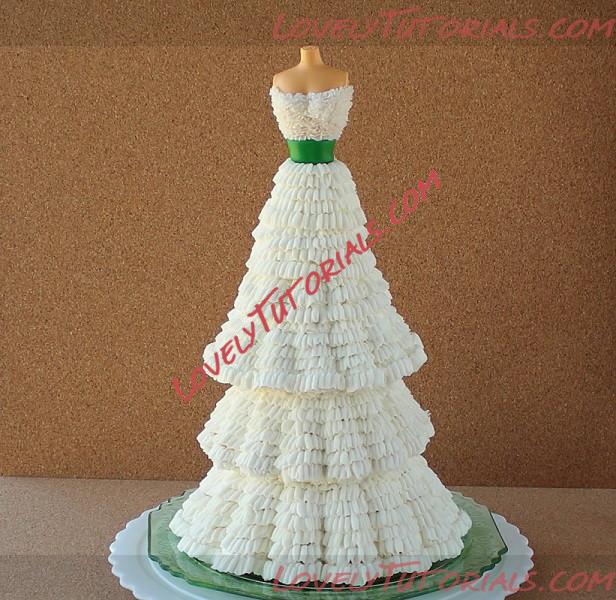
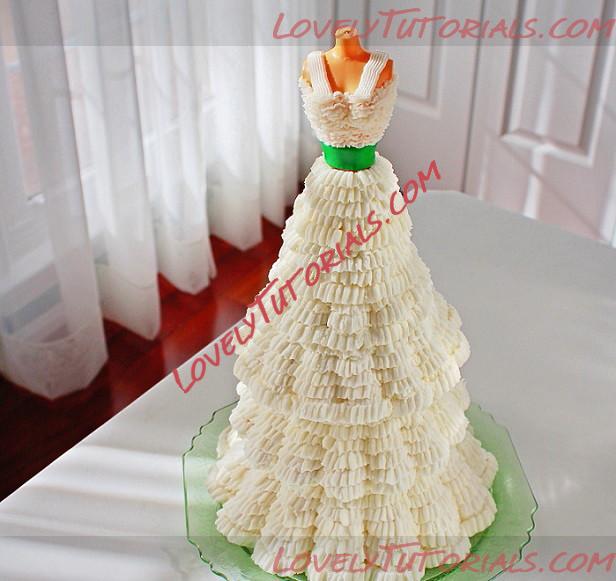
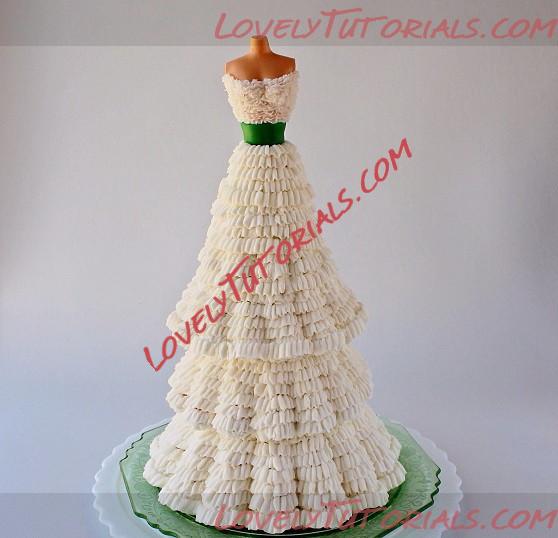
Once all the layers are stacked, filled and frosted, I insert the doll right in the center and pipe some more frosting on the torso to complete the cake. For this mannequin cake, I made a belt out of fondant and tinted it green and frosted the cake with white buttercream frosting.


Название: 14.jpg
Просмотров: 0

Размер: 70.7 Кб
I’ll just think of this mannequin cake as an idea for St. Patrick’s Day. It was kind of inspired by that memorable dress Scarlett O’Hara wore to the barbecue in Twelve Oaks, and since we’re in the month of March, it sort of fits the Irish theme. Besides, wasn’t she half Irish anyway?


Название: 15.jpg
Просмотров: 0

Размер: 90.2 Кб
It used to be I hear the word Irish and I immediately think of Irish coffee, Irish crystal, green shamrocks and even an old movie about a magic shillelagh. Lately, though, all that has changed. I hear the word Irish and the first thing that comes to mind is that Branson character in Downton Abbey. I know everyone has an opinion on that show, and I’ll just say I do follow it and will surely watch the next season. Personally though, I prefer the Forsyte Saga, which I loved, loved, loved so much that I bought the complete DVD set when it came out. But that’s just my two cents.


Название: 16.jpg
Просмотров: 0

Размер: 69.7 Кб
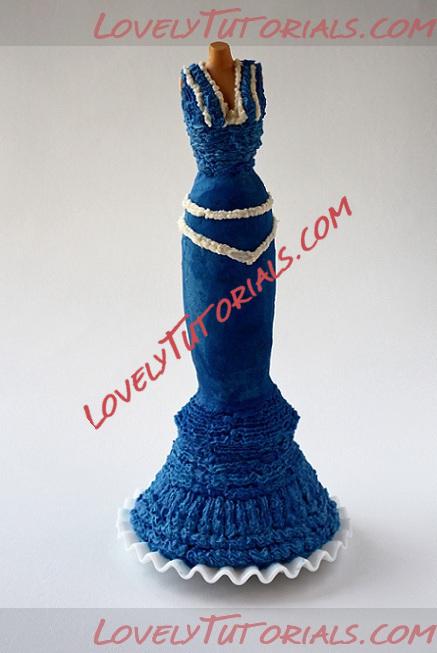
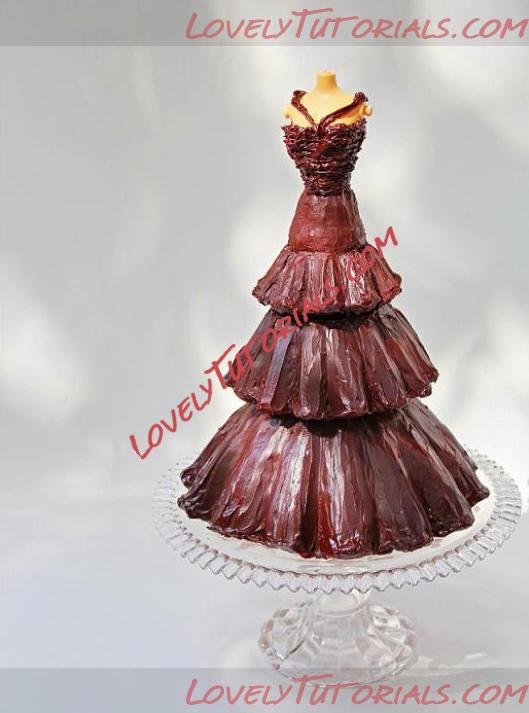
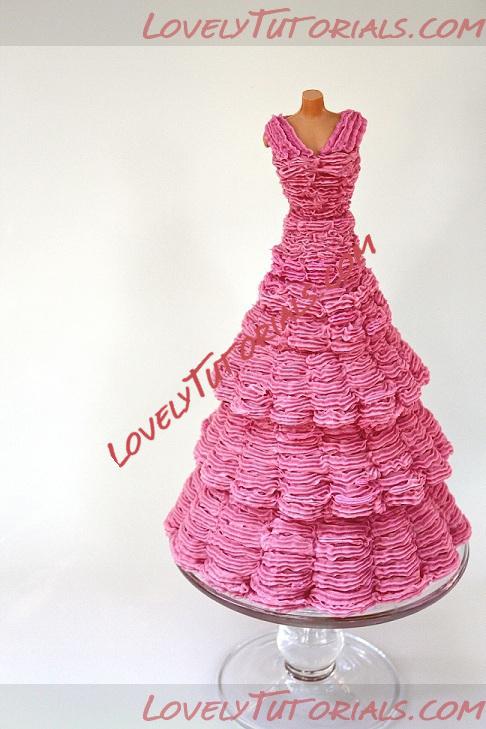
Using five cake layers in this mannequin cake made it so tall I thought it best not to place it on a cake pedestal. It’s the tallest of mannequin cakes I’ve made so far. The earlier chocolate mannequin cake used three layers, while the pink mannequin cake used four. The blue mannequin cake was the slimmest as much of the cake was made of small cake rounds stacked all the way down from the waist. Since the blue mannequin cake was so slim, it was the only one I secured with one of those jumbo milkshake straws driven down the center for stability. I probably ought to use a straw in my next project and see if it matters with this type of mannequin cake.


Название: 17.jpg
Просмотров: 0

Размер: 75.6 Кб
This was really a fun project for me. Making a mannequin cake is like playing with dolls, the only difference is, it’s edible.


Название: 18.jpg
Просмотров: 1

Размер: 94.8 Кб
Mannequin Cake
So there it is. This is how I make my mannequin cakes, because it works for me. As with anything in life, do whatever you’re comfortable with and whatever works for you.


Название: 19.jpg
Просмотров: 0

Размер: 70.5 Кб
Hope this post on how to make a mannequin cake was useful, or at least in some way entertaining.


Название: 20.jpg
Просмотров: 0

Размер: 87.2 Кб
Старый 17.03.2013, 10:34
Arianka Arianka вне форума
Администратор
Регистрация: 05.03.2013
Сообщений: 698
По умолчанию
How to Make a Mannequin Cake
You will need:
  • One recipe Vanilla Buttermilk Cake, or other preferred cake recipe
  • One recipe Buttercream Frosting, or other preferred frosting recipe
  • One doll torso
  • One doll cake pan, or
  • Fluted pans: 8”, 6.5”, 6”, 3.5”, 3”, 2.5”
  • Heating core for 8” pan

Vanilla Buttermilk Cake for Mannequin Cake Layers
Adapted from Sky High by Alisa Huntsman and Peter Wynn
Ingredients:
  • 2 sticks (8 ounces) unsalted butter at room temperature
  • 2 cups sugar
  • 4 whole eggs
  • 2 egg yolks
  • 1 ¼ cups buttermilk
  • 3 cups cake flour
  • 4 ½ teaspoons baking powder
  • ½ teaspoon salt
  • 2 teaspoons vanilla extract
Preparation:
  1. Preheat the oven to 350 F. Spray the bottoms and sides of 6 fluted cake pans of graduating sizes, 8”, 6.5”, 6”, 3.5”, 3”, 2.5”. Spray a heating core both inside and place in center of 8” pan.
  2. Sift together the flour, baking powder and salt.
  3. With a flat beater attachment, beat the butter until smooth and creamy, then gradually add the sugar and beat until light and fluffy.
  4. Add eggs and egg yolks one at a time beating each well after each addition.
  5. Add 1/3 of the sifted dry ingredients, then 1/2 of the buttermilk. Repeat alternating with the dry ingredients and the buttermilk, ending with the dry ingredients.
  6. Fill the pans to 2/3 full and place on a cookie sheet.
  • Bake three larger pans at 350 F for 35 minutes.
  • After 35 minutes place a sheet of foil lightly on top of all three pans to prevent overbrowning
  • Bake for another 5 minutes
  • Remove 6” pan
  • Bake for another 5 minutes
  • Remove 6.5” pan
  • Bake for another 5 minutes
  • Remove 8” pan
  1. Place 3 smaller pans on a cookie sheet and bake for about 17 – 20 minutes.
  2. Allow the cakes to cool before turning out of pans.

Buttercream Frosting
Ingredients:
  • 1 cup unsalted butter
  • 1 cup shortening
  • ¼ teaspoon salt
  • 8 cups powdered sugar
  • 4 tablespoons milk
  • 2 teaspoons vanilla extract
  • 2 tablespoons corn syrup
Preparation:
  1. With a flat beater attachment, cream the butter until smooth and creamy.
  2. Add shortening and continue to beat until well blended.
  3. Add salt continuing to beat on medium speed.
  4. Add powdered sugar gradually beating well.
  5. Add milk and continue to beat until smooth.
  6. Add vanilla and beat until well blended.
  7. Add corn syrup and beat until fully incorporated.
  8. Tint buttercream frosting as desired.

Assembly
  • Trim cake layers as desired. Select which cake layers to use. There may be one or two layers that will not be necessary, depending on the desired height of the cake.
  • Place the largest layer on a cake plate narrow end up. Pipe frosting with an icing bag and desired icing tip. Spread filling on top of cake layer.
  • Repeat procedure with next layers ending with the smallest cake layer. Insert doll in center.
  • Pipe frosting all around the doll.

Название: SugaryWinzy-How-to-Make-a-Mannequin-Cake21.jpg
Просмотров: 1

Размер: 168.5 Кб
Старый 17.03.2013, 10:45
Arianka Arianka вне форума
Администратор
Регистрация: 05.03.2013
Сообщений: 698
По умолчанию
blue mannequin cake
Название: blue mannequin cake.jpg
Просмотров: 0

Размер: 72.2 Кб

chocolate mannequin cake
Название: chocolate mannequin cake.jpg
Просмотров: 0

Размер: 43.2 Кб

pink mannequin cake

Название: pink mannequin cake.jpg
Просмотров: 1

Размер: 129.7 Кб
"pelenė", 3d, 3d bizcocho, 3d bolo, 3d cake, 3d dort, 3d kage, 3d kager, 3d kake, 3d kek, 3d pastel, 3d tarta, 3d torta, 3d torte, 3d torti, 3d torty, 3d κέικ, , adding the quilted skirt, addım-addım təlimat, adım, adım adım yönergeler, ako na bábiku, artesanatos passo a passo, askepot, askepot kjole, askepott, askepott kjole, askungen, assepoester, baba készítése, baba torta, bambola torta, banphrionsa, barbi kake, barbie bebek, barbie bebek pastasi, barbie bolo, barbie cake, barbie gâteau, barbie kage, barbie kuchen, barbie skirt tutorial, barbie tort, barbie torta, barbie torte, barbie v bábovce, barbie v dortu, barbie κέικ, barbiekage, barby bebek yapimi, bebek kek, bemutató, bir kız için kek, birthday cakes, bizcocho, bolando bolos, bolo, bolo barbie passo a passo, bolo boneca, bolo para a menina, bolo para a princesa, bolo para a rapaza, boneca de bolo, bábika, bábika tortu, bánh, bánh cho công chúa, bánh ngọt cho các cô gái, cacen ar gyfer merch, cacen tywysoges, cake, cake decorating, cake decorating techniques, cake for girl, cake for princess, cake para sa batang babae, cake para sa prinsesa, cake ສໍາລັບ princess, cake ສໍາລັບເດັກຍິງ, cakes for kids, cendrillon, cenerentola, cenicienta, cenusareasa, chica, ciasto, cinderela, cinderella, cinderella abiye, cinderella dress, cinderella dress cake tutorial, cinderella gúna, cinderella habitu, cinderella haljina, cinderella jurk, cinderella kleit, cinderella klänning, cinderella princess cake, cinderella prinzessin kuchen, cinderella pukeutua, cinderella rok, cinderella ruha, cindrulino, cindrulino robo, confeitando bolos, covering the board, covering the cake, creazione e decorazione torte, crustulam pro puella, cô bé lọ lem, công chúa, císte, císte do banphrionsa, císte do chailín, decoracion de pasteles, decoración de tortas, decorada en fondant, decorare le torte, decorazioni, deko fondant, dekorace na dort, dekoracija, dekoracije, dekorasyon, dekorácie, dievča, doll cake, dort, dort barbie, dort barbie panenka, dort panenka, dort pro dívky, dort pro princeznu, dort s barbie, dort složený z panenky barbie, dorty narozeninové, dress cinderella, dukke kage, dukke kager, dukke kake, dívka, dětské dorty, errauskine soineko, female, fender, filia reginae, fillette, fimo, flower paste, fondan, fondant, fondente, fondente di zucchero, fotopostup, foundant, fustan cinderella, gato pou princess, gato pou ti fi, gaun cinderella, gebak, geburtstagstorte, girl, glazuur, gum pasta, gum paste, gumpaste, gâteau, gâteau " barbie", gâteau barbie, gâteau poupée, gâteau pour fille, gâteau princesse, hamupipőke, hand-made, handmade, hercegnő, hirushja, how to, how to make a mannequin cake, how-to's, idea per torta barbie, instrucţiuni, instrukcijas, instrukcje, jak na, jente, kage, kage barbie, kage dekoration, kage dukke, kage til pige, kage til prinsesse, kagedekoration, kager, kaka, kake, kake barbie, kake dukke, kake for jenta, kake for prinsesse, kakebaking, kakku, kakku barbie, kakku nukke, kakkua prinsessa, kakkua tyttö, kejk, kejk għall girl, kejk għall princess, kek, kek barbie, kek untuk gadis, kek untuk puteri, keki kwa msichana, keki kwa princess, keks, kindergeburtstag, koek vir meisie, koek vir prinses, kook, kook printsess, kook tüdruk, kopciuszek, korak, korak za korakom navodila, korak-po-korak upute, koristeet ja koristelu, krok, krok po kroku, krok za krokem, krok-za-krokem, księżniczka, kuchen, kuchen barbie, kuchen doll, kuchen für prinzessin kuchen für mädchen, kue, kue untuk gadis, kue untuk putri, kuko por knabino, kuko por princino, külkedisi elbise, köku fyrir prinsessa, köku fyrir stelpu, kız, kūka, kūka meitene, kūka princese, la barbie, las instrucciones, las técnicas, le tecniche, les techniques, lukie, lutka torta, lėlė tortas, making the bodice, making the draps, making the overskirt, marshmallow, masa flexible, master-class, master-klasse, master-klasy, mavazi cinderella, meisje, meistras klasės, menina, metodikas, mistr třídy, mixing the modelling pastes, modeling paste, modellierpaste, modelling past, motivtorten, mädchen, neska for tarta, návod, opplæringen, pakaian cinderella, pamoka, panenka, panenka v dortu, panenka v šatech, pap, pas, pas-cu-pas, pas-à-pas et modèles, paso, paso a paso, passo, passo a passo, passo-a-passo, passo-passo le istruzioni, pasta bebek, pasta de goma, pasta de miel, pasta flexible, pasta laminada, pastel, pastel de barbie, pastel de muñeca, pastel de princesa, pastel para chica, pastís de princesa, pastís per noia, pelenės suknelė, pelnrušķīte, pelnrušķīte kleita, pepeljuga, pepelka, pepelka obleko, pige, placenta pro filia reginae, pocelana fria, polymer clay, popelka, popelka šaty, popoluška, popoluška šaty, postup na 3d torty, postup na barbie, postupak za ukrasavanje, poupée gâteau, prenses, prenses pasta, preparing the cake for freezing, princesa, princesas em biscuit, princese, princesha, princess, princess cake, princesse, princesė, princesė tortas, princeza, princezna, princezná, princino, principessa, prinses, prinsesa, prinsessa, prinsesse, prinsessekage, printesa, printsess, printzesa, printzesa for pastela, prinzessin, puppe kuchen, puteri, putri, pyragas barbie, pâtisserie, qız, qız tort, ragazza, robe de cendrillon, rochie cenusareasa, schmelzend, schritt für schritt anleitung, schritt-für-schritt, schritt-für-schritt-anleitungen, shaping the cake, sinderela, sinderela dress, sinderela gwisg, sindirella, stap, stap-voor-stap, stap-voor-stap instructies, steg for steg, steg för steg, steg-för-steg, steg-för-steg-instruktion, step, step by step, step-by-lépésre, step-by-step, step-by-step instructions, styrofoam, sugarcraft, sugarpaste, suikerglazuur, sukienka cinderella, sütemény hercegnő, sütemény lány, taart barbie, taart pop, taart voor meisje, taart voor prinses, tarta, tarte, technieken, techniken, techniki, techniky, technikák, techniques, tecnicas de decoracion, tecniche, tehnici, tehnike, teknikker, teknikler, tips och trix, tort, tort barbie, tort dla dziewczynki, tort dla księżniczki, tort lalka, tort papusa, tort papusa barbie, tort pentru fete, tort pentru printesa, tort z lalką, torta, torta baba, torta bambola, torta barbie, torta barbie sirena, torta lutka, torta per la ragazza, torta pre princeznú, torta principessa, torta za dekle, torta za djevojke, torta za princeso, torta za princezu, tortas, tortas lėlė, tortas mergina, torte, torte decorate, torten dekorieren, torti, tortu, tortu barbie, tortu bábika, tortu pre dievčatá, torty, tortë për princeshë, tortë për vajzë, trin, trin for trin, trin-for-trin, trin-for-trin instruktioner, trinn, trinn for trinn, trinn-for-trinn-instruksjoner, trucs et questions sur la décoration de gateaux, tuhkatriinu, tuhkimo, tutorial, tutoriale, tutorias, tutorias/ideas para decorar los bizcochos, tutoriel, tutorijal, tywysoges, tårta barbie, tårta docka, tårta för flicka, tårta till prinsessa, tårtbottnen, tårtor, técnicas, ukrašavanje torti, uputstvo za dekoraciju, ventafocs, vestido cinderella, vestido de cenicienta, vestit de la ventafocs, vestito cinderella, váy cinderella, zoluşka, zoluşka dress, zuckermasse, સિન્ડ્રેલા, સિન્ડ્રેલા ડ્રેસ, છોકરી માટે કેક, રાજકુમારી, રાજકુમારી માટે કેક, ಸಿಂಡರೆಲ್ಲಾ, ಸಿಂಡರೆಲ್ಲಾ ಉಡುಗೆ, ರಾಜಕುಮಾರಿ, ರಾಜಕುಮಾರಿ ಕೇಕ್, ಹುಡುಗಿ ಕೇಕ್, सिंड्रेला, सजा केक, लड़की के लिए केक, ट्यूटोरियल मास्टर वर्ग, उपेक्षिता पोशाक, केक, कदम, कदम दर कदम निर्देश, गुड़िया केक, तकनीक, राजकुमारी, राजकुमारी के लिए केक, সিন্ড্যারেল্যা, সিন্ড্যারেল্যা পোশাক, কুমারী, মেয়ে জন্য পিষ্টক, রাজকুমারী জন্য পিষ্টক, பெண் கேக், சிண்ட்ரெல்லா, சிண்ட்ரெல்லா ஆடை, இளவரசி, இளவரசி என்ற கேக், సిండ్రెల్లా, సిండ్రెల్లా దుస్తుల, యువరాణి, యువరాణి కోసం కేక్, అమ్మాయి కేక్, เค้ก, เค้กสำหรับสาวชุด cinderella, เค้กเจ้าหญิง, เจ้าหญิง, ნამცხვარ? ამ?სთვ?ს პრ?ნცესა, პრ?ნცესა, ტორტ? ამ?სთვ?ს გოგონა, კონკ?ა, კონკ?ა კაბა, バービーケーキ, ケーキ, çocuk & bebek pastaları, étape, étape par étape les instructions, öğretici, 人形のケーキ, 娃娃蛋糕, žingsnis, žingsnis po žingsnio, şahzadə, şahzadə üçün tort, 宗師級教程,一步,一步一步的指示 � � �技術,udžbenik, 灰姑?,公主,为公主蛋糕,蛋糕的 �孩,灰姑?礼服, 灰姑?,公主,為公主蛋糕,蛋糕的 �孩,灰姑?禮服, 裝飾蛋糕, 蛋糕, 공주?을위한 케이크, 만들기 제작 과정, 케이크, 소녀 케이크, 신데렐라 공주?, 신데렐라 드레스, κούκλα τούρτα, κέικ, κέικ για κορίτσι, κέικ για πριγκίπισσα, βήμα, βήμα προς βήμα οδηγίες, οδηγίες βήμα βήμα, παντεσπάνι art, πριγκίπισσα, σταχτοπούτα, σταχτοπούτα φόρεμα, τούρτα κούκλα, τούρτα μπάρμπι, τουρτα πριγκιπισσα, τεχνικές, φροντιστήριο, декорация на торти стъпка по стъпка, день рождения, девочка, деские торты, дзяўчынка, дівчинка, инструкция, как сделать, крок за кроком, крок за крокам, кукла торт, покроково, попелюшка, полимерная глина, пошагово, пошаговые фотки, пакрокава, папялушка, пепелашка, пепелашка фустан, пепеляшка, пепеляшка рокля, пепељуга, пепељуга хаљина, платье золушки, плаття попелюшки, принцеза, принцеса, принцесса, прынцэса, миниатюра, мк, мк торт "3д манекен с платьем", мк торт "платье золушки", момиче, майстор-класа урок, майстар-клас, майстер-клас, майстер-класи, маршмеллоу, мастика, мастер-класс, барби торт, зд торт, зд торта, золушка, лялька торт, ручной работы, ручная работа, украшение тортов, сахарная мастика, уроки прикрашання, сукенка папялушкі, стъпка, стъпка по стъпка инструкции, торт, торт для девушки, торт для дзяўчыны, торт для дівчини, торт для принцеси, торт для принцессы, торт для прынцэсы, торт кукла, торт барби, торт барбі, торт лялька, торта, торта кукла, торта барби, торта за дево?ка, торта за дево?чице, торта за принцеза, торта за принцезу, торта за принцеса, торта за момиче, торта стъпка по стъпка, техники, техника, техніка, туториал, туторіал, тэхніка, фимо, холодный фарфор, шаг за шагом, інструкцыя, інструкція, עוגה לנערה, עוגה לנסיכה, סינדרלה, סינדערעלאַ, סינדערעלאַ קלייד, נסיכה, פּרינצעסין, שמלת סינדרלה, ש?יקל פֿאַר מיידל, ש?יקל פֿאַר פּרינצעסין


©2022 Lovely Tutorials
Content Relevant URLs by vBSEO