Огромная благодарность Автору SugaryWinzy за Мастер-класс
This post is in response to a couple of requests for a tutorial on how to make a mannequin cake. This is just one way to make a mannequin cake, and I should more aptly say, this is how I make a mannequin cake. I’ve been wanting to do this for a while, but I’ve been so busy lately.
When I bake a cake, I often stagger the stages, so I bake the layers first, then wrap and freeze them until such time when I can give the cake project my attention for assembling and frosting. Making a mannequin cake is no exception. Sometimes it can be weeks before I can get back to it. If I plan to use a buttercream frosting, then I make the frosting the night before if I can. Otherwise, I just make the frosting the same day that I assemble the cake.
We’re almost always pressed for time, I know I am. So before I even begin I thought I would show this cake pan designed exclusively for baking the same kind of cake. It is quite simple and straightforward to use. Funny thing is, I’ve had it for such a long time but have never even used it. It’s one of those pans I have on the back burner but just never get around to it. I imagine this pan would cut down on prep time and would take care of all the cake layers in one shot.
So here are the pans I use. When I saw them at Sur Le Table, I was instantly smitten because they reminded me of a skirt Actually, I think these pans are really meant for baking brioche. But never mind that. I wanted to make it work for a cake, so I first got only three pans, large, medium and small. And that is how I made this
first mannequin cake. The smallest pan in front is actually a tart mold. The largest pan is a bit of a challenge as it is 8” at its widest point by 3” deep. The first time I used the large pan, to make sure the batter baked all the way through, I tried baking it with a rose nail in the center. Now a rose nail is really meant to be used for piping roses on, rather than act as a heat conductor for baking cakes. But it was all I had at the time, so, well, you use what you have and improvise. The rose nail did work, but with a little bit of a challenge in that I had to constantly watch the cake and had a hard time telling if the cake was done all the way through. So I bought a heating core, shown in the first row on the left. It’s a tool used for wider baking pans to ensure cake batter is baked all the way through the center. It definitely was more efficient as far as conducting heat. If I recall correctly, I might have ordered it from Amazon.
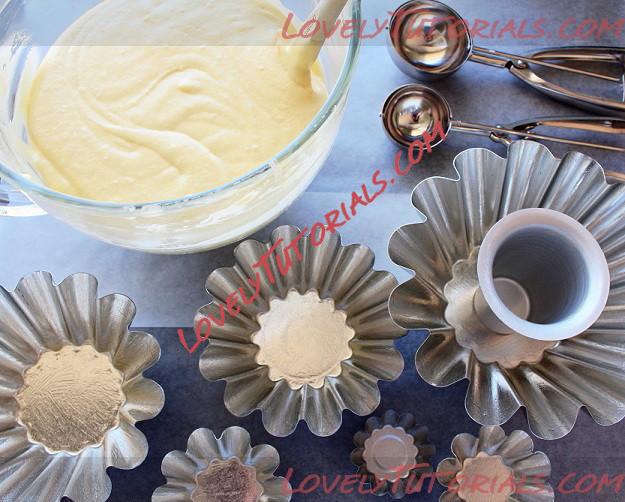
Here the pans are all ready for the batter. The heating core has to be sprayed both inside and outside. I sprayed the pans generously with non-stick cooking spray, and, with a pastry brush, evenly brushed the non-stick spray all over the surfaces to make sure all the crevices were coated. I use a cookie scoop to prevent drips and neatly fill the pans.
These are really more layers than I need, but since the recipe I used yields a generous amount of batter I thought I might as well bake the spare layers in case I messed up. I also could have used the extra batter to bake cupcakes, but at this point, I still didn’t know what style of skirt I was going to make, so it didn’t hurt to have extra layers.
I baked the three larger layers first and placed them on a cookie sheet. The two smaller size pans will bake ahead of the larger pan. This is how I recorded the baking times when using these pans:
- Bake all three at 350 F for 35 minutes
- After 35 minutes place a sheet of foil lightly on top of all three pans to prevent overbrowning
- Bake for another 5 minutes
- Remove 6” pan
- Bake for another 5 minutes
- Remove 6.5” pan
- Bake for another 5 minutes
- Remove 8” pan
Then place the three smaller pans in the oven and bake for about 17 – 20 minutes.
The cake layers are done and out of the oven. I have to say it was intimidating the first time I used these pans because after the layers were baked, it then just occurred to me I wouldn’t be able to run a knife all the way down the pans to remove the cakes because of the fluted sides. So I just gently ran a knife just along the top edges to loosen the cake. When I turned the pan upside down, I slightly stretched the top edges of the pan sideways, as it does have a little bit of give, enough to make the cake slide right out.
Here is the cake portion baked in the heating core, ready to be plugged into the gap of the large layer. Any unevenness in the surface can easily be trimmed off. I wrap all the layers well and freeze them. Once the cake is sliced the portion filled by the heating core blends right in with the rest of the cake and is barely discernible.
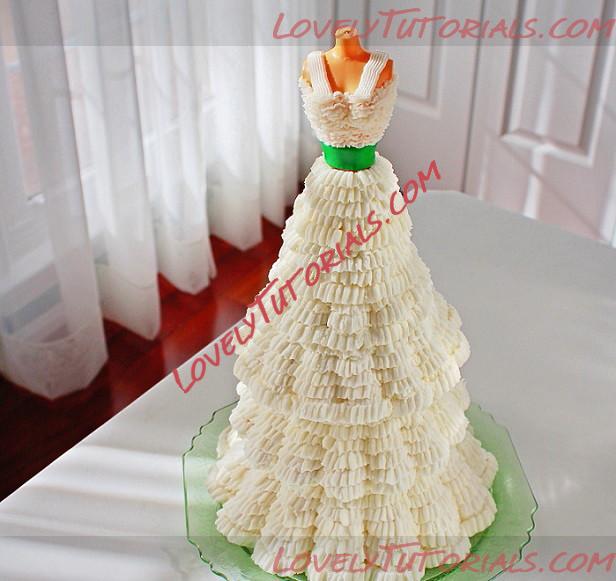
Okay, now for assembly. At this point, which layers I decide to use or decide to trim is entirely subjective. It all depends on how high I want the cake to be and what shape of dress I want to make. Here I’ve trimmed a bit off of the larger layers.
There’s really no right or wrong in frosting this cake. It’s pretty much free form. Anything goes. This time, I thought I would use tip 103 and go all around each layer piping the frosting with an up and down motion of my wrist to give the surface a different kind of texture. This is where my turntable really comes in handy. I just go round and round until the surface is covered.
Here is the underside of the next layer. I find it easier to pipe the frosting first underneath along the edges. Not sure why I added some more green filling here since I had already filled the center of the bottom layer. I sometimes do things without giving much thought. I place this directly on top of the bottom layer with the wide side down and narrow side up. Then again, I pipe frosting all around the second layer. I repeat the same steps and continue to stack the layers. I used a total of five for this cake, so that left me one small unused cake layer.
Once all the layers are stacked, filled and frosted, I insert the doll right in the center and pipe some more frosting on the torso to complete the cake. For this mannequin cake, I made a belt out of fondant and tinted it green and frosted the cake with white buttercream frosting.
I’ll just think of this mannequin cake as an idea for St. Patrick’s Day. It was kind of inspired by that memorable dress Scarlett O’Hara wore to the barbecue in Twelve Oaks, and since we’re in the month of March, it sort of fits the Irish theme. Besides, wasn’t she half Irish anyway?
It used to be I hear the word Irish and I immediately think of Irish coffee, Irish crystal, green shamrocks and even an old movie about a magic shillelagh. Lately, though, all that has changed. I hear the word Irish and the first thing that comes to mind is that Branson character in Downton Abbey. I know everyone has an opinion on that show, and I’ll just say I do follow it and will surely watch the next season. Personally though, I prefer the Forsyte Saga, which I loved, loved, loved so much that I bought the complete DVD set when it came out. But that’s just my two cents.
Using five cake layers in this mannequin cake made it so tall I thought it best not to place it on a cake pedestal. It’s the tallest of mannequin cakes I’ve made so far. The earlier
chocolate mannequin cake used three layers, while the
pink mannequin cake used four. The
blue mannequin cake was the slimmest as much of the cake was made of small cake rounds stacked all the way down from the waist. Since the
blue mannequin cake was so slim, it was the only one I secured with one of those jumbo milkshake straws driven down the center for stability. I probably ought to use a straw in my next project and see if it matters with this type of mannequin cake.
This was really a fun project for me. Making a mannequin cake is like playing with dolls, the only difference is, it’s edible.
Mannequin Cake
So there it is. This is how I make my mannequin cakes, because it works for me. As with anything in life, do whatever you’re comfortable with and whatever works for you.
Hope this post on how to make a mannequin cake was useful, or at least in some way entertaining.
