то может устоять перед сокровищами пиратов? Уверена, что пиратские монетки из полимерной глины, которые мы будем делать в этом уроке, пробудят интерес к сокровищам в каждом человеке.
Благодаря своей античности, древности и состаренному виду, монеты идеально подойдут в качестве декоративных объектов или украшения на вечеринку пиратов.
Итак, приступим.
Материалы и инструменты для работы
1. полимерная глина белого, черного цветов
2. Золотая, серебряная или бронзовая пудра
3. Паста-машина
4. Резак V-образной формы
5. Шило или острый конусообразный инструмент для отверстий
6. Распечатанная картинка с изображением монеты
7. Кусочек джинсовой ткани для полировки
8. Лак для покрытия готового изделия

- Polymer Clay
- Premo - White
- Premo - Black
- Sculpey Bake & Bend (preferably, but other polymer clay brands will do in a pinch)
- Metallic Wax
- Gold, or any other color you prefer
- Pasta Machine
- V-shaped Linuleum Cutters
- Clay Piercing Tool
- 400 grit sandpaper
- Denim Cloth
- Finish, such as varathane or future floor polish.
Шаг 1
На первом шаге необходимо создать молд (форму) для штамповки, при помощи который мы сможем сделать неограниченное количество монет.
Для этого прокатайте пласт белой глины на паста-машине на максимальной толщине, вырежьте круг и отправьте его запекаться на 20-30 минут при температуре 110 градусов цельсия.
Размер круга зависит от того, какого размера монеты вы хотите сделать. Размер монеты в этом уроке около 4-х сантиметров.
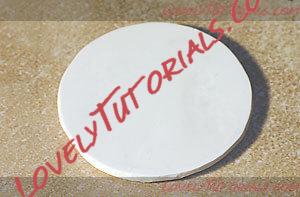
The first step is to create mold that you then use to create the push-molds that you will create your coins with. Start out by running the clay through your pasta machine at the thickest setting. Create a round shape, and bake it for about 20 minutes. The size of the circle depends on the size of coin you want to make. The coins in this tutorial is about 1 5/8” diameter.
Шаг 2
Для дизайна монет вы можете использовать картинку из этого урока, либо любую подходящую картинку, которая вам нравится.
Распечатайте рисунок на принтере и обрежьте квадратом, так, чтобы центр рисунка находился в середине.
Затем положите картинку на запеченную пластину из полимерной глины и закрепите надежно (можно приклеить, либо зафиксировать углы клейкой лентой или скотчем)
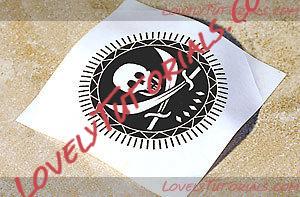
For the design of the coin, you can use the one provided with this tutorial (
Download Here), or make any pattern you want on your computer. Print the design on your home printer and cut out a big square with the design in the middle. Put the design centered over the clay circle, then tape it down securely at each corner.
Шаг 3
На третьем шаге нужно перенести рисунок с бумаги на пластину по контурным линиям: для этого воспользуйтесь шилом или другим острым конусообразным предметом.
Сделайте отверстия по всему контуру рисунка, чтобы наметить области для вырезания.
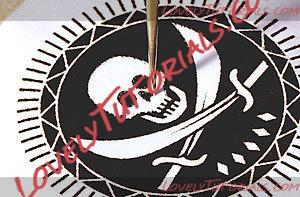
To transfer the pattern to the clay, use a piercing tool to puncture holes along the outlines. Alternatively, use a carbon paper. (However, it can be hard to get a very strong carbon paper transfer on the clay.)
Шаг 4
После того, как вы контурно наметите все линии рисунка нужно резаком V-образной формы вырезать все черные части картинки.
Небольшие неровности при вырезании только придадут монетам более состаренный и древний вид, поэтому не старайтесь быть особо точными при вырезании.
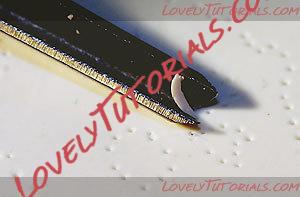
Once all the outlines are created, use the linoleum cutter to cut away all the black parts from the pattern. A bit of irregularity just lends to the look of an old, worn coin, so there is no need to be too precise.
Шаг 5
После вырезания всех черных областей картинки получаем готовую форму для штампования, при помощи которой будут получаться монеты с вогнутым рисунком.
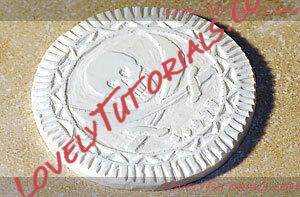
This is the finished mold, with all the black areas cut away.
Шаг 6
Положите на полученный молд (форму)раскатанный пласт глины и прижмите. Таким образом, мы получим молд с вогнутым рисунком, который позволит штапмовать монеты с выпуклым изображением.
Если вы хотите чтобы монеты были двухсторонними, вам нужно сделать две формы.
Отправьте штампы запекаться.
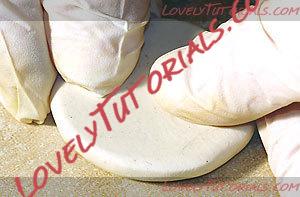
Press the Bake & Bend clay on top of the mold to form a push mold that will be used to create the coins. (To make two-sided coins, you will need to create two molds.) Bake according to the manufacturer's instructions. (If you can't find Bake & Bend clay, regular polymer clay will also work. Bake & Bend is just a little easier to use as a mold because of its increased flexibility.)
Шаг 7
После того как штампы запекутся, дайте им остыть, а затем сточите верхние края штампов до такого размера, какой вы хотите сделать толщину монет.
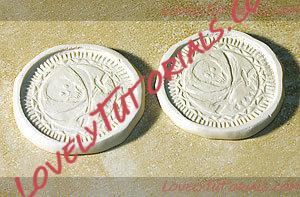
After the molds are baked, sand the top edges on both of them till they will fit close enough together to make a coin of the thickness you want. If you want the two sides of the coins to match (with the skull vertical on both sides), carefully place one on top of the other with the correct alignment, then make a small mark on the outside of each half of the mold-- a line across both pieces.
Шаг 8
Приступаем к лепке самих монет.
Для этого положите раскатанный пласт глины между двумя молдами и сожмите их.
Количество используемой пластики зависит от желаемого размера монеты. В этом уроке используется примерно ¾ части от размера штампа-оригинала.
Для более точного совпадения рисунка на обеих сторонах монеты сделайте на штампах отметки с обеих сторон.
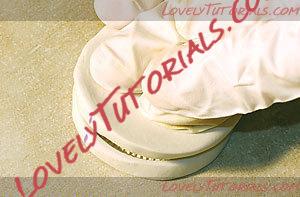
To prevent the clay from sticking to the molds, use some sort of release agent. For this project, we prefer to mist the molds with a little bit of water from a spray bottle, but you can also use cornstarch, baby powder, or whatever release agent you like. Put a piece of black clay between the two molds and press them together. The amount of clay depends on the size of the coin; for this coin, we used a ball about 3/4” big. Line up the marks you made in the previous step to match the pattern on both sides of the coin.
Шаг 9
Хорошо сжимайте два штампа до тех пор, пока черная глина не заполнит всё пространство.
Чтобы избежать прилипания пластика к штампам, используйте воду (из распылителя), детскую присыпку, крахмал или тальк.
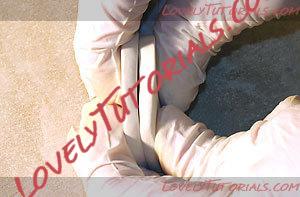
Press the molds together till the black clay fills the entire void.
Шаг 10
Осторожно отделите получившуюся монету от молдов и отправьте запекаться на 20-30 минут при температуре 110 градусов по Цельсию.
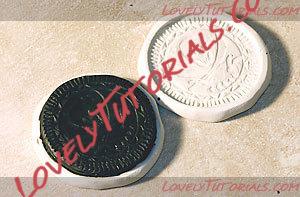
Gently pull the molds apart, remove the coin from the mold, and bake the coin according to the clay manufacturer's guidelines (which you can find on the clay package).
Шаг 11
Чтобы придать монетам древний и состаренный вид воспользуйтесь золотой пудрой или краской: аккуратно пальцем либо кисточкой смажьте все выступающие поверхности монеты. Также можно использовать бронзовую, серебряную или медную
пудру (краску).
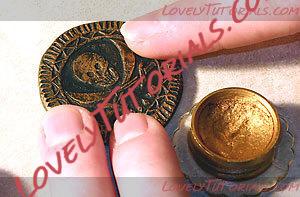
Now for the finishing touch! Use your finger to rub the metal wax onto all the raised areas of the coin. This will give it the look of an ancient golden coin. Of course other metallic colors, such as silver or copper, can also be used.
Шаг 12
Если вы использовали краску, то дайте ей окончательно высохнуть. Для более интенсивного блеска можно отполировать монеты кусочком джинсовой ткани.
Чтобы предотвратить стирание краски (или пудры) рекомендуется покрыть готовые монеты лаком (например, Varathane или Future или другим подходящим лаком для пластики)
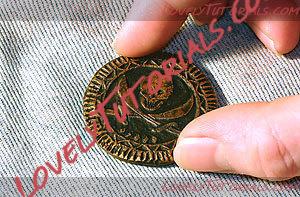
Once the wax has completely dried, you can buff it lightly with a soft denim cloth to give it some extra shine. If you plan to use the coin where it will be handled a lot, finish with a coat of varnish, such as Varathane or Future. This will prevent the metal wax from rubbing off.
Итог
В результате проделанных действий у нас получились вот такие интересные пиратские сокровища:
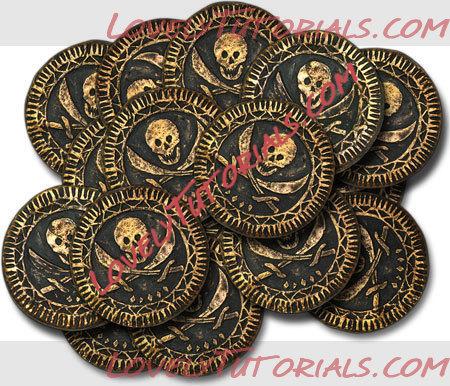
You can set up a production line to make a whole pile of pirate coins. Or, if you want to turn a single coin into a pendant (for a pirate costume, perhaps), insert an eye pin into the coin before you bake it. (To make sure the eye pin doesn't come loose later, you can carefully pull it out of the baked coin, dab the pin with superglue, and reinsert it.)


 For the design of the coin, you can use the one provided with this tutorial (Download Here), or make any pattern you want on your computer. Print the design on your home printer and cut out a big square with the design in the middle. Put the design centered over the clay circle, then tape it down securely at each corner.

 This is the finished mold, with all the black areas cut away.
 Press the Bake & Bend clay on top of the mold to form a push mold that will be used to create the coins. (To make two-sided coins, you will need to create two molds.) Bake according to the manufacturer's instructions. (If you can't find Bake & Bend clay, regular polymer clay will also work. Bake & Bend is just a little easier to use as a mold because of its increased flexibility.)
 To prevent the clay from sticking to the molds, use some sort of release agent. For this project, we prefer to mist the molds with a little bit of water from a spray bottle, but you can also use cornstarch, baby powder, or whatever release agent you like. Put a piece of black clay between the two molds and press them together. The amount of clay depends on the size of the coin; for this coin, we used a ball about 3/4” big. Line up the marks you made in the previous step to match the pattern on both sides of the coin.
 Press the molds together till the black clay fills the entire void.


