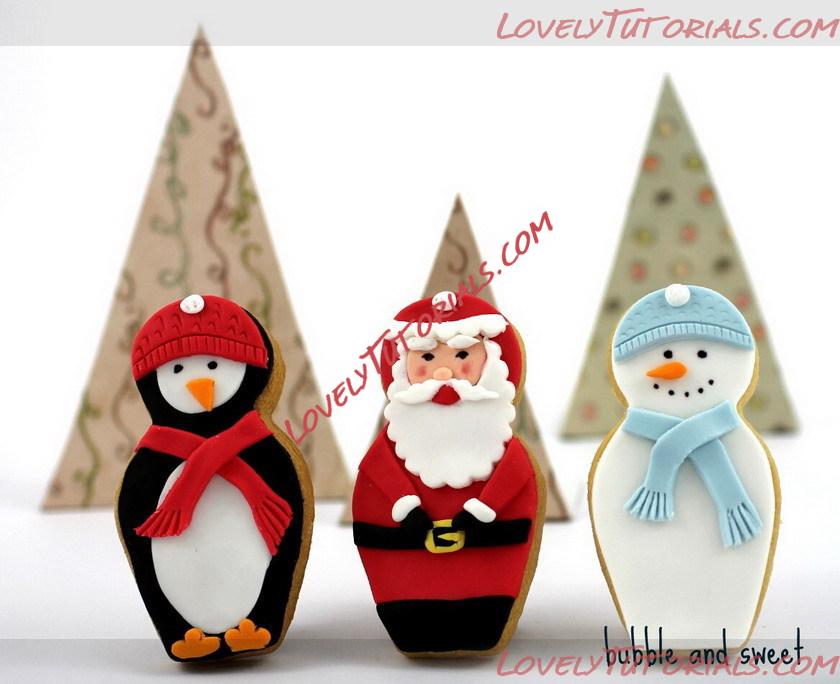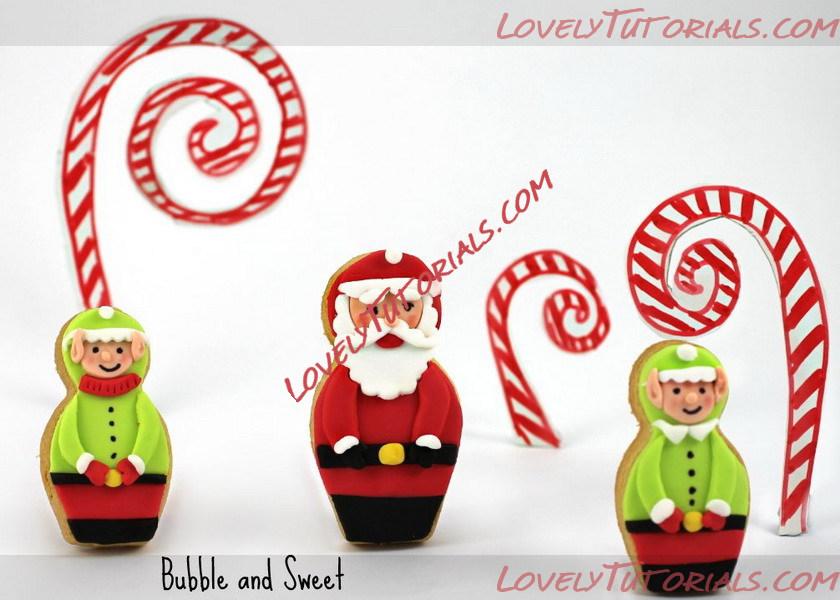

Santa nesting doll cookies
Огромная благодарность Автору bubbleandsweet за Мастер-класс
These instructions use the medium nesting cookie cutter, follow the exact same instructions for small or large nesting doll cutter.
Sugar cookies made using medium nesting doll cookie cutter
Red, White, Skin tone, black and yellow rolled fondant shop bought or home made marshmallow fondant (I used shop bought fondant colored with black americolor gel)*
small oval cutter with ruffled edges(around 5cm or 2ish inch) - I picked this up on Ebay in a set of 4
Medium/Large piping tip (I used #195)
small rolling pin
medium nesting doll cookie cutter (around 9.5cm or 3 3/4 inch)
small sharp knife
clean brush and water
black edible writing pen
pink dusting powder plus dry clean brush
*Fondant dries out very quickly. Use small amounts work quickly and when not in use place the fondant in an airtight container or ziplock bag to minimise the chances of it drying out and cracking.
Roll out the red fondant onto a clean benchtop dusted with cornflour/ cornstarch until a couple of mm (1/8") in thickness. I like to lift my fondant frequently and turn it like pie dough to ensure it does now stick to the bench while rolling it out.
Use the nesting doll cookie cutter to cut out a shape. Do the same with the black colored fondant.
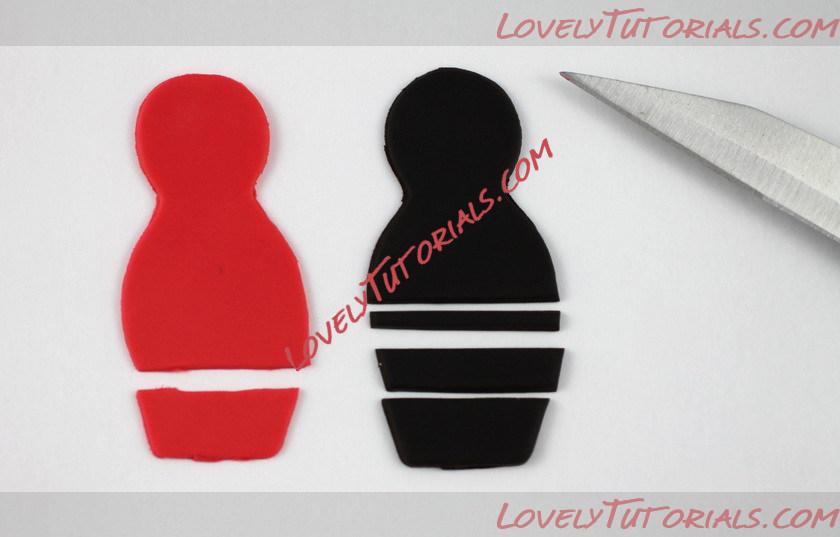
Place the red and black fondant next to each other to use as a guide and using the sharp knife cut out boots and a belt from the black fondant, at the bottom of the red fondant cut a matching piece off that will be replaced with the black 'boots'. Use a small amount of water to adhere the red body and black boots to the cookie, using the rolling pin to press into place as necessary. Attach the belt to Santa's middle using a tiny amount of water and press in place.

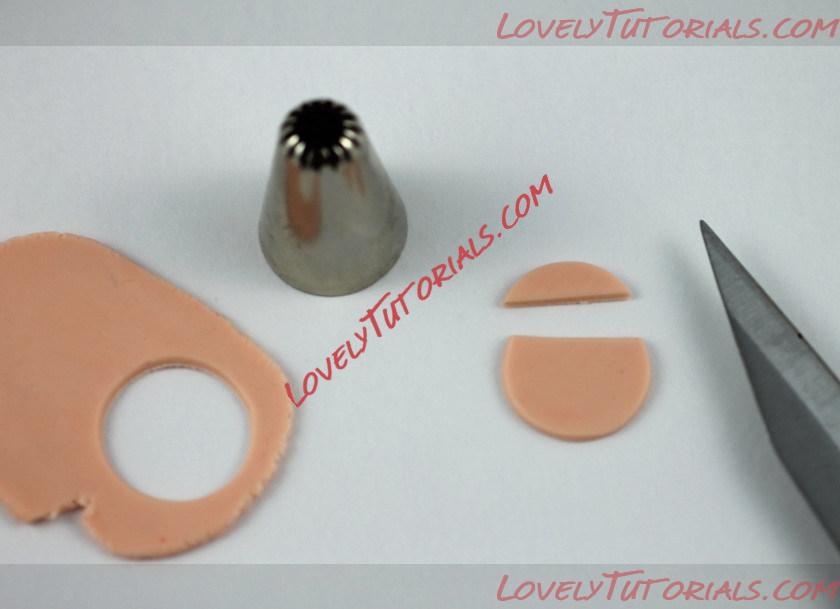
Roll out a small amount of skin tone fondant and using the large round end of a piping tip - I used a Wilton #195 which is a bit bigger than the regular piping tips. Cut a little bit off the top of the round as per picture, this is where the hat will sit. Using a tiny amount of water attach the skin tone face to the cookie (use completed cookie picture as guide). You will need to roll out a bit more of the red fondant and use the nesting doll cookie cutter to cut out the head area, then use the sharp knife to cut out a beanie/hat and attach it to the fondant covered cookie. Take a little bit extra of the red fondant and press into a small round to make a mouth. Attach it to the bottom of the skin tone face.

Roll out some white fondant and cut out a shape using the oval ruffle cutter. Then use the piping tip to remove the 'face' to make a beard- see the picture. You can then remove a small amount of the top and fit the white 'beard' around the skin tone face which you have already attached to the cookie.
Roll out a little more of the white fondant and once again using the ruffled oval cutter make the ruffle on the edge of the hat and the mustache. You will need to cut out the oval and then use the knife to trim a long thin ruffle to make the hat trim, attach it with a small amount of water. Use the same technique to make the mustache and then attach it using a tiny amount of water on top of the red mouth on the skin tone face. Pinch a little bit of the excess skintone fondant shape into a tiny nose and attach to the face right above the mustache.
Roll out more of the red fondant and again cut out the nesting doll shape. Using the sharp knife cut out the arms from the nesting doll shape as per the picture.
The rest is pretty much rolling out the small shapes by hand and attaching them to the cookies. Once again super fiddly like the nutcracker so don't say I didn't warn you.
Take a small piece of black fondant and shape a couple of small mitten like hands and attach them to the cookie at the ends of the arms.
Take a tiny amount of yellow fondant and shape little rectangles to make the belt buckle. If you like you can roll out tiny little ropes and make a more realistic looking buckle like I did for the original cookies but if your doing lots of them it would be easier to do the rectangles.
Take a small amount of white fondant and shape into a small ball for the top of the beanie/hat and attach with a little water and then do the same for a couple of eyebrows and trim on the arms where they meet the black mittens.
Allow the fondant on the Santa to dry a couple of hours and then using the edible pen draw on 2 eyes. If you like use a clean brush to brush on a couple of circles of pink dusting powder to the cheeks.


