Огромная благодарность Автору Kidacity за Мастер-класс
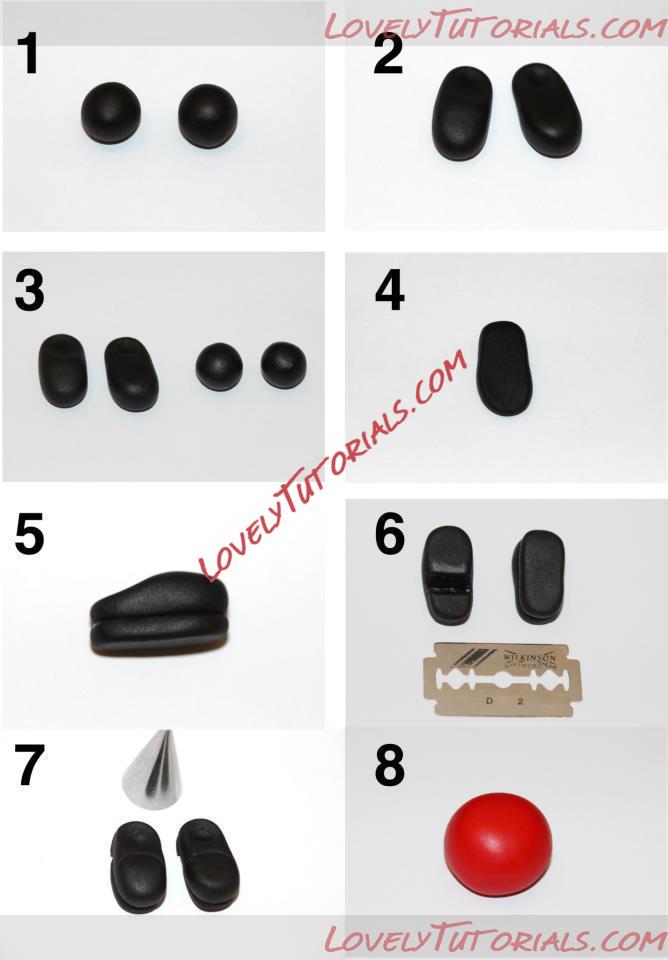
1. Make 2 equal sized black balls of gumpaste
2. Squeeze the balls into ovals and slightly curve each shoe inwards. At the heel end use your ball tool to push in a bit of a rivet (this will be where the leg attaches)
3. Make 2 smaller balls of black gumpaste (these will be the sole of the shoe)
4. Flatten and shape similar to the bottom of the shoe.
5. Attach with either a small amount of water or with edible glue
6. Using a stanley knife (I work with a blade a lot as I find it easier) cut out a wedge 2/3 of the way down the shoe to create a heel. I think its a nice bit of detail when you can see the bottom of the shoe as with this figurine.
7. Use an icing tip to create a little ridge at the front of the shoe
8. Roll a ball of red gumpaste the size that you'd like Santa's body
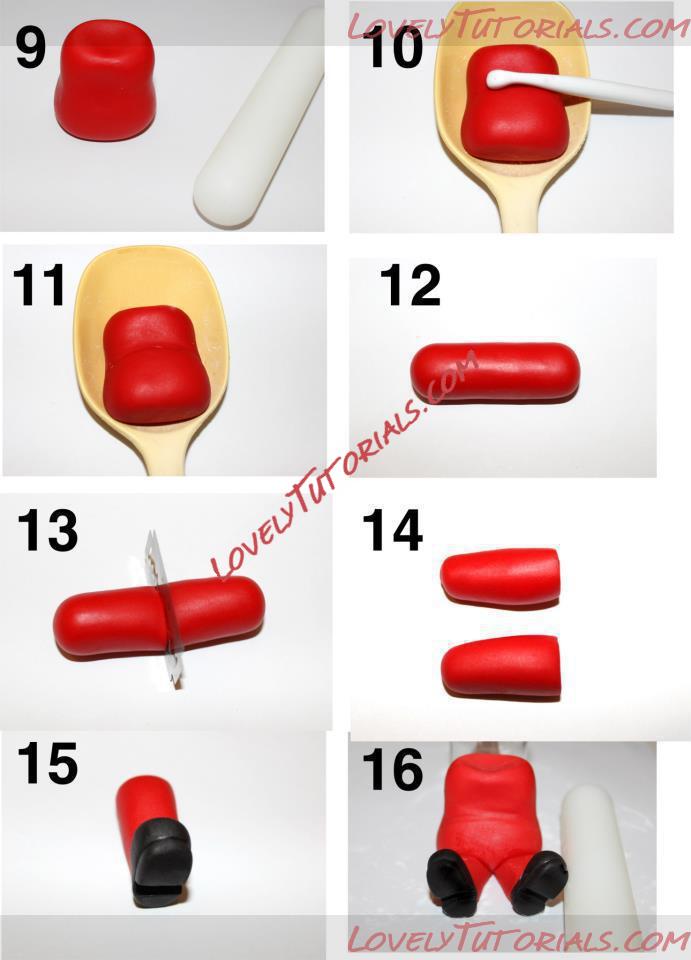
9. Elongate the red ball you've made and use your fingers to roll a slight indent through the middle to give santa some shape.
10. Using a small roller (or something similar with a round end) make a slight indent in the top end of the body... this will make it easier to place the head later.
11. I use a large spoon to let the body dry so it isn't flat on the back. Make sure its well dusted with cornflour to avoid sticking. Use your shaping tools (or the edge of a paintbrush) to rock around the side of the body so that santa now has a tummy! At this stage I would leave the body to harden.. if he's too soft when you stand him upright you will lose his shape and then gumpaste will sink into itself.
12. Roll out a tube of red gumpaste
13. cut the tube into 2 equal parts to create the legs
14. Taper the bottom ends of the legs to create an ankle. I've forgotten to take a pic but at the "thigh" end of the legs flatten the top which will make it easier to affix it to the body.
15. The shoes should have hardened up for you a bit in the time you've been making the body and legs. Attach the shoes into the ankle end of the leg (where you've previously made an indent).
16. Attach both legs to the body using water or edible glue. I like to add character by having the feet point out a little. If you do this you may need support while it dries (I've used my roller in this pic). Note that I have a small bottle behind the body. This is to ensure his body dries straight and has support
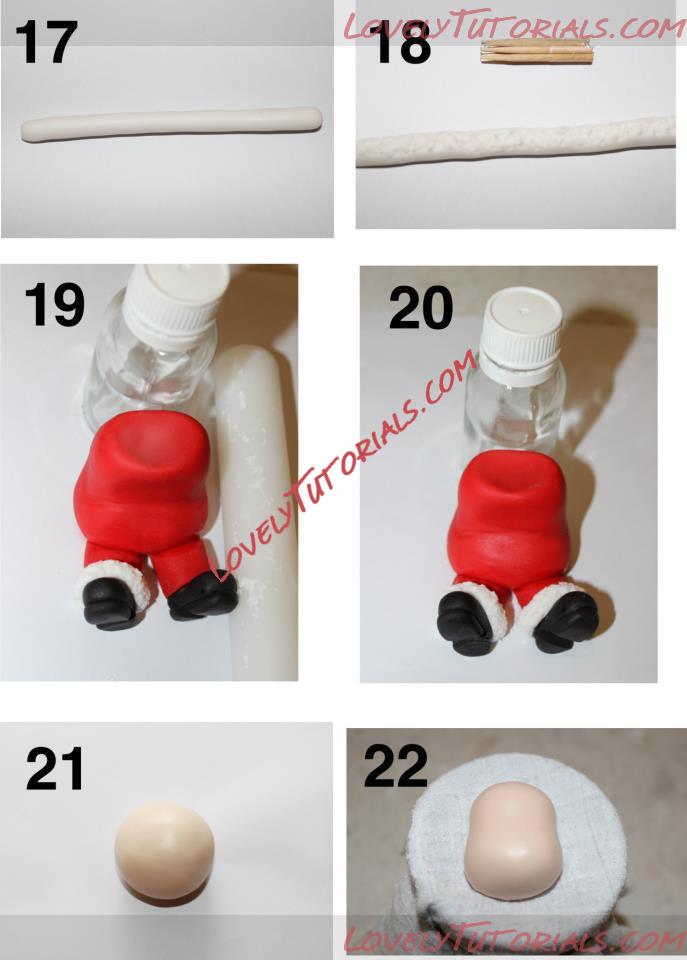
17. Roll out a thin white tube of gumpaste. This will be used as the fur around both legs so make sure its long enough.
18. I picked this technique up a few days ago and wish I could remember the fb page to thank them! Secure stickytape around a bundle of toothpicks with all the pointed ends together. Push them gently into the gumpaste and using a slightly circular motion you will get a lovely fur like texture. I worked the top and sides of the gumpaste and then any areas I'd missed once I'd attached to the legs.
19. Using a tiny bit of water secure the fur to the bottom of the leg, butting up to the top of the shoe.
20. Do the same with the other leg. Note that I still have the bottle behind the body until its 100% dry for support.
21. Roll out a flesh coloured ball of gumpaste. This will become Santas face.
22. Elongate as you did with his body and once again roll the shape between your fingers to slightly indent the sides of the face. I discovered a wonderful way to dry faces (and most shapes needing a rounded back) from a peony tutorial by Cake Journal. I've just put a piece of muslin wrap around the top of a glass and secured with a rubber band. This way the bottom of Santas head is supported yet not flattened when you're working on it. As with the spoon used for the body to dry ensure the muslin is well coated with cornflour first to avoid sticking.
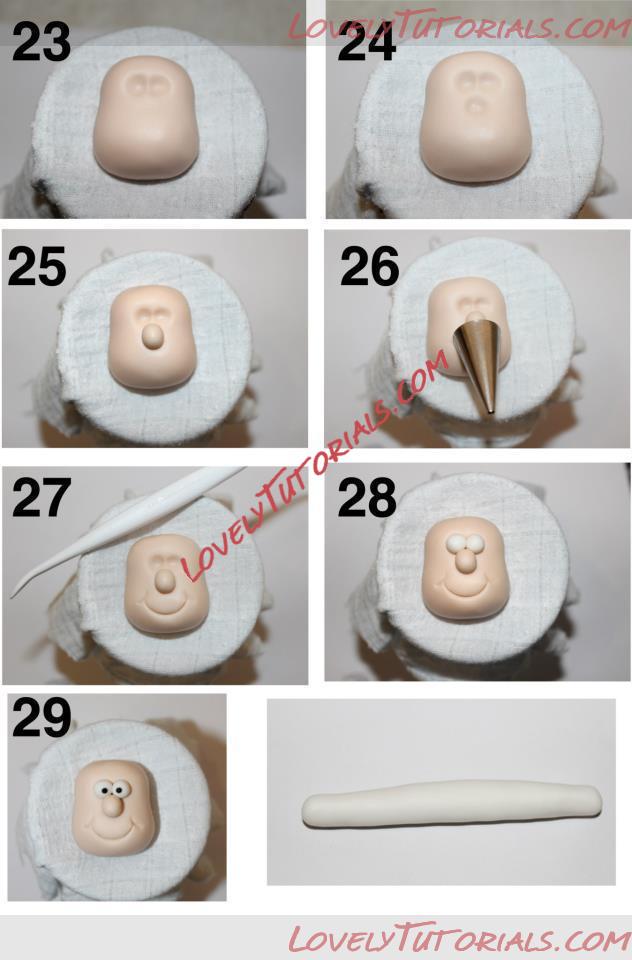
23. Using your small ball tool mark holes where you want each of the eyes to be.
24. Using the small ball tool mark the hole in the place you want the nose to be. With my santa I wanted it directly underneath his eyes.
25. Roll a small ball of gumpaste into a ball and then elongate for his nose. The placement of his nose and its shape will lend to his unique personality.
26. Using your icing top and making sure that its centered to the nose (look from the top before pressing down), press the bottom half of the icing tip into the gumpaste to form an arc for santas mouth.
27. Using your Dresden tool (well thats what I've been calling it) press little arcs into the corner of the mouth to give him little cheeks. You can add a dimple if you wish.
28. Make 2 balls of white gumpaste and ensure they are the same size for the eyes. Without affixing them test them in the holes to make sure you are happy with them and then use a little water to secure.
29. For the pupils you can either use a tiny ball of flattened black fondant or you can wait until its 100% dry and paint them in. I've used fondant for this Santa. Once again the positioning of his pupils will determine where he is looking and add to his expression.
30. Roll out a tube of white gumpaste that will become his beard. Taper both the ends (I ended up tapering more than is pictured)
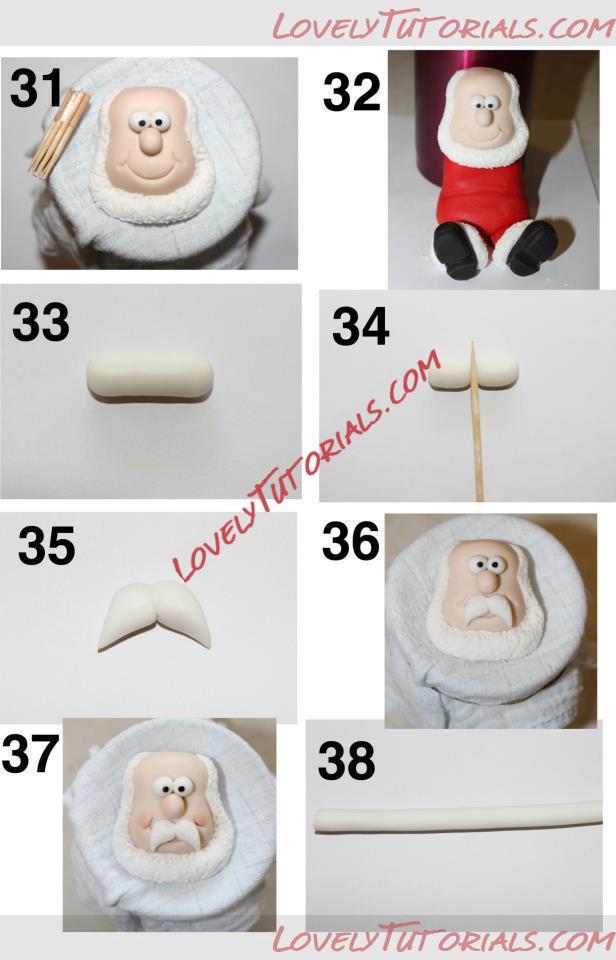
31. Attach santa's beard using a little water and use your fingers to get a shape you are happy with. I then used my toothpicks to add texture again to the places I'd played with.
32. This step is REALLY IMPORTANT and will make putting santas head on his body a lot easier when you come to do it. Gently place santas head on his body ensuring its straight and centred to his shoulders and lightly push down. What this will do is put an indent behind the beard and mean his head should nestle in nicely when you go to attach it.
33. Roll out a small tube of white gumpaste which will become his mustache.
34. Using a toothpick, roll in the centre of the white gumpaste, lightly pressing while rolling to create a centre indent.
35. Taper the ends of his mustache so you get some nice sharp edges. Lightly (using just one toothpick so you don't mess with the shape) add some texture.
36. Attach his mustache centred on his mouth.
37. You can wait until the end but I decided to do his cheek and lip definition now. Using pink petal dust lightly dust his cheek area and I also added a little bit to the side of his nose for a ruddy complexion. I also add a tiny bit to where I've created the mouth to emphasise it.
38. Roll out a thin tube of white fondant which will become the trim on the bottom of his suit and wrap in glad wrap (this is a good habbit to get into whenever you are rolling or cutting anything thats not being used immediately... and I realised this pic actually has a step before it lol)
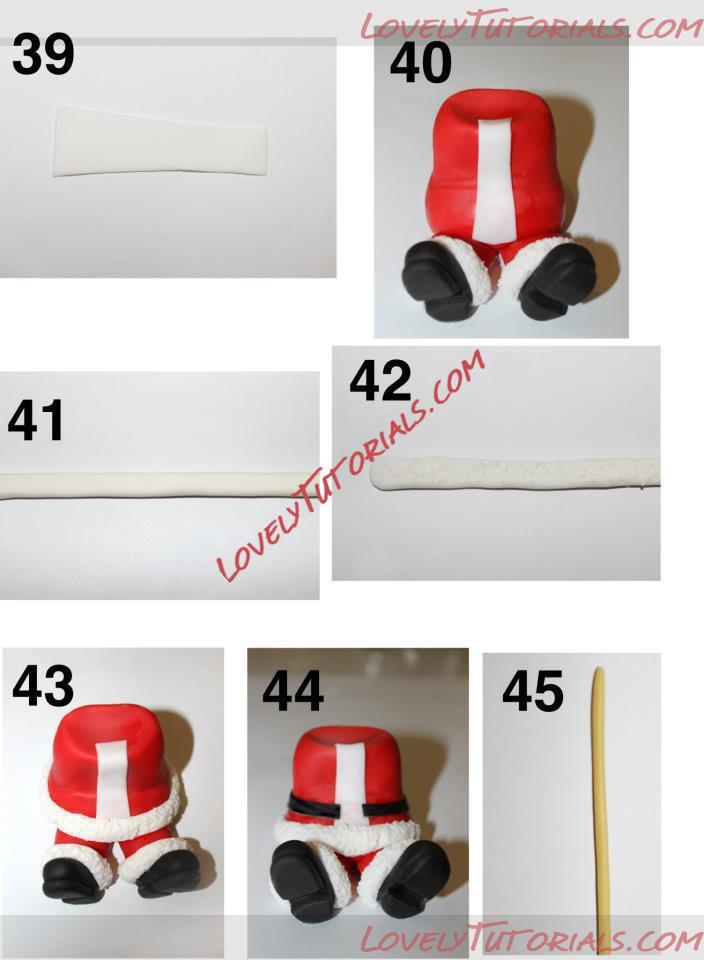
39. Roll out a thin piece of white gumpaste and cut out a rectangular piece. Make one end of the rectangle slightly larger, this will go at the bottom to emphasise santas tummy.
40. Use a small amount of water to stick the rectangle (larger side at bottom) to santas body. An overlap at the top means the white will go all the way to his chin and make for a neater finish.
41. Grab the rolled out white fondant from earlier (sorry!!) and thin it out slightly with your rolling pin.
42. Add the texture with toothpicks as before.
43. Add the fur to the very bottom of santas suit using a little water. Make sure where the ends meet up is at the back and use a toothpick to add texture around the join so its seamless.
44. Roll out a thin, flat piece of black fondant and cut out a narrow strip. This will be his belt so ensure its long enough to go around his tummy. Adhere with a little water ensuring the ends are at the front, slightly overlapping the white rectangle.
45. Roll out a very thin tube of yellowy gold gumpaste (I'm in the habit of making it a gold colour first, in case there is anywhere I miss with the gold lustre)
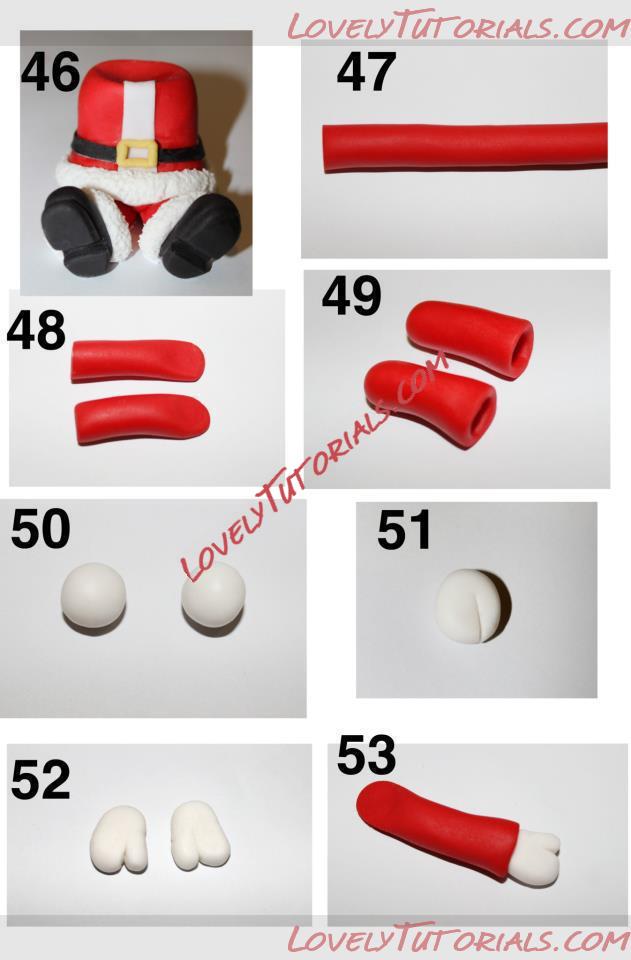
46. Make a little rectangle shape covering the ends of the black belt and the full width of the white rectangle. If you find it fiddly I find a toothpick really helps to secure the ends etc.
47. Roll out a tube of red gumpaste and hold it up next to santas body to ensure you are happy with the width of his arms.
48. Cut one length of arm and check you are happy with the length against his body and then cut another the same length.
49. Using the end of a paintbrush or your ball tool push an indent into one end of each arm as shown (this will be where your hand sits within the sleeve).
50. Roll out two equal size small balls of white gumpaste the size of his hands (once again measuring against the arms is helpful.
51. Using a scalpel or small scissors cut about 1/3 of the way in as shown to create santas thumb in his mittens.
52. Using the dresden tool smooth and separate the thumb and fingers so you have nice rounded edges and they look like mittens.
53. Attach the hand into the arm using a small amount of water or glue and then slightly flatten the top where the shoulder will attach to the body. Make sure you have the thumbs on on the inner side before you attach (I add this bit as I've been guilty of attaching without thinking!!)
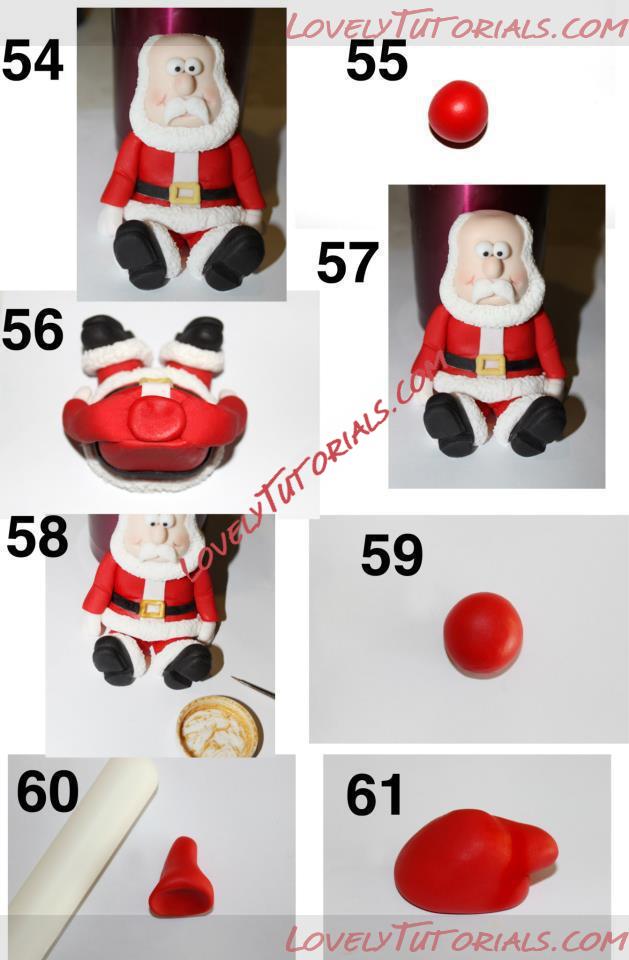
54. Attach the tops of santas arm to his body using water or edible glue and start to shape them on his body so he has elbows etc. At this stage I use a toothpick to add a few creases to his arms. I've temporarily placed his head back on to make sure I'm happy with shoulder width etc before I attach it.
55. Roll out a ball of red gumpaste. This will become his neck and a way of securing his head to his body.
56. Attach the ball to the top and centre of santas body where a neck would be and moisten the top of it with water.
57. Attach santas head to his body. He's beginning to look like santa now!! Make sure his head is straight and again I've used a bottle behind to made sure his head aligns straight with his body and to support it while it dries in place.
58. Use gold lustre dust and a fine paintbrush to paint santas belt buckle (I use 2 coats... the 2nd once the first has dried).
59. Roll out a red ball of gumpaste which will be santas hat.
60. Taper and round one end and using your rolling pin or similar make a hole in one end for santas head. At this stage you can try it on him and make sure its a good size.
61. Bend the top of his hat over and create some shape.
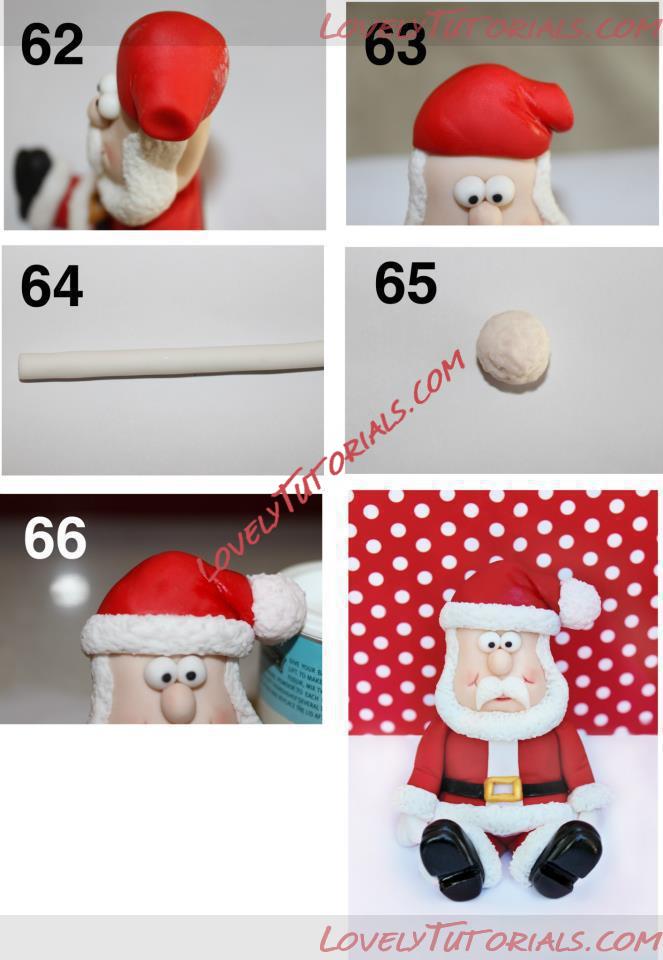
62. Attach santa's hat to his head with a little water and smooth down the edges so it sits flush on his head.
63. It looks a little like the ventricles of a heart here! At this point, as with the body I add shape using my fingers and add some creases using a toothpick.
64. Roll out a thin white tube of gumpaste and flatten, add fur texture with your toothpicks and attach to the very rim of the hat. As with the fur on his coat make sure it attaches at the back and then add texture to hide the join.
65. Make a ball of white gumpaste and add the texture. I did a bit at this stage and then redid areas once I'd attached the pompom.
66. Attach the pompom to the end of santas hat with a little water and use a bottom or similar to hold it in place until completely dry.
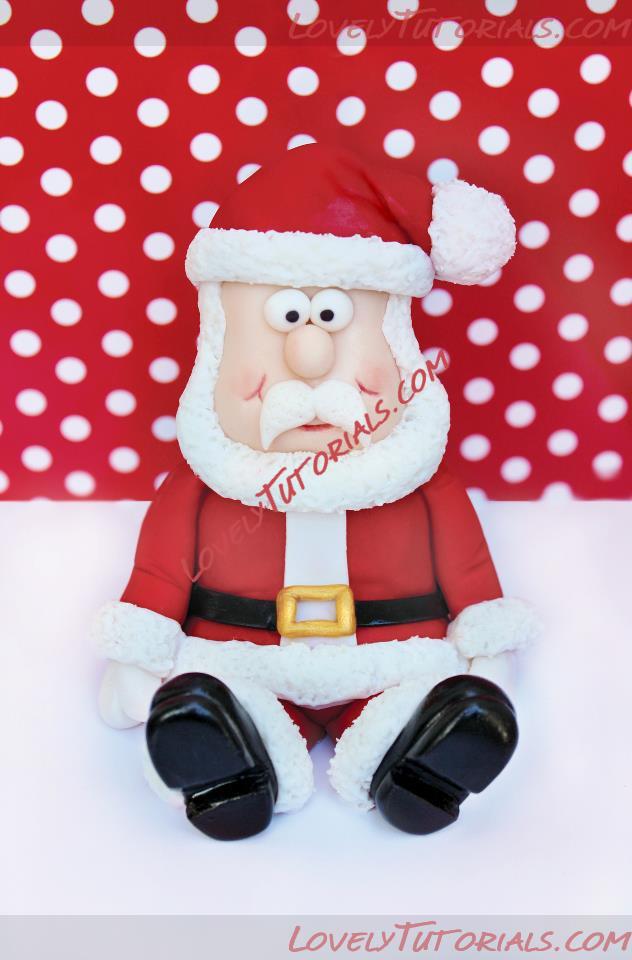
Well at this stage santa is finished! All I've done at this point is dusted off all the cornflour and painted on piping gel on his boots and belt to give them a nice shine. Because this topper will be seen from the back as well as the front I've added some hair below his hat using the fur method to match his beard and mustache.
I really hope this was of some use and apologies for the length of it. If you are still reading/following THANK YOU and I'd love to see your completed santa figurines. Merry Christmas everyone x


